AWS Rekognition to create an Avatar
AWS is the Amazon’s cloud platform which is full of ready-to-use services. In this entry, we’re going to take a look at one of the services offered by AWS, Rekognition, which is a Machine Learning service that is able to analyse photographs and videos looking for objects, people or text.
But beyond analysing the service itself, we’re going to look at a practical case study in which we will develop an application that will use this service. The objective is to create an avatar according to the characteristics of the person that appears in the photo that we want to analyse.
The technologies that we will be working with are:
- Amazon Rekognition: The image analysis service offered by Amazon. Thanks to this service we can extract information from the images or videos that we upload: objects present in an image, a person’s characteristics or recognition of the text embedded in the photo are just some of the options that it gives us
- SpringBoot: This could be the most used Java framework for the back-end in web applications. Its auto-configuration characteristics, embedded server and facilities for integration with other Spring frameworks or modules have brought about its popularity
- React: React is the library for developing the FrontEnd that we will use in this example due to the convenience that it offers for the creation and composition of reusable components. For our example, we’ll also use the existing component Avataaars
Other options
AWS isn’t the only platform that offers us facial recognition services. Both Google and Microsoft also include similar services in their platforms.
AWS Rekognition
We have 12 months to use the API for free, with a limit of 5,000 images per month.
The API has a client library for multiple languages, which facilitates its use and configuration.
As for the API’s response, as well as detecting the position of the facial elements, it offers us different labels for finding out if the face has a certain characteristic, for example, if the mouth or the eyes are open. In addition to probability, most of the labels incorporate a Boolean value, that is:
mouthOpen=false 97.0: It tells us that it is 97% probable that the photo features a closed mouth.
Google Vision AI
The Google API for image processing is called Vision AI. Like AWS, it offers us a free service for 12 months and for the first 1,000 images per month.
It also has a library, in several languages, to make the clients who use the platform’s lives easier.
As for the API, it offers different analysis options according to the objective, although these can be combined. Therefore, depending on what we want to analyse, we have:
- LABEL_DETECTION: : Identifies the presence of certain attributes: Face, Mouth, Forehead, Chin, smile, ...
- FACE_DETECTION: Gives us the coordinates of the facial elements: right eye, left eye, mouth, ... and tells us the mood hown on the face
In contrast to the AWS API, it doesn’t give us booleans on the labels, it only gives us the coincidence percentage. Also, there are less labels.
Azure Computer Vision
Azure has Computer Vision Face
Here, we also have 12 months of free service to carry out 30,000 transactions per month with the facial recognition API.
We also have an SDK in Java that we can get through Maven to facilitate our client’s integration.
As for API’s response, once again, it detects the position of the facial elements for us in order to tell us the mood shown on the face.
In this case, as well as the mood, the API gives us more facial characteristics, such as the hair colour or if they’re bald, if they’re wearing make-up or accessories like a hat or glasses. Here, we have attributes that are given with a probability percentage and others that are given as boolean values.
Let’s get started!
AWS Rekognition
We’ll start by setting up an account in AWS which will allow us to use the service. As this is our first time, we’ll have a trial period of 12 months which, for this concept test, comes in very handy indeed.
By the way, you can find out more about AWS Rekognition and its configuration in the documentation provided by AWS: https://docs.aws.amazon.com/rekognition/latest/dg/rekognition-dg.pdf
Creating the AWS Rekognition account
If you already have an AWS account, you can skip this step, but if you don’t... you have no other option than:
- Access https://aws.amazon.com to create the account, clicking on: “Create an AWS account"

- Enter the requested details to create the account over several screens:
-
Login information
-
Contact information
-
Payment information
Don’t worry, $1 will be charged to your account to verify that everything is correct and will be returned to you afterwards
-
Mobile number where you will receive an SMS to validate your identity
-
And, finally, we’ll select the Basic (Free) plan as this is only a concept test, right?

Now that you’ve created your account, you’ll have the welcome e-mail in your inbox, now you can connect to your administration panel with the e-mail and password that you provided earlier, which will give you access to all of the AWS services and which will look like this.
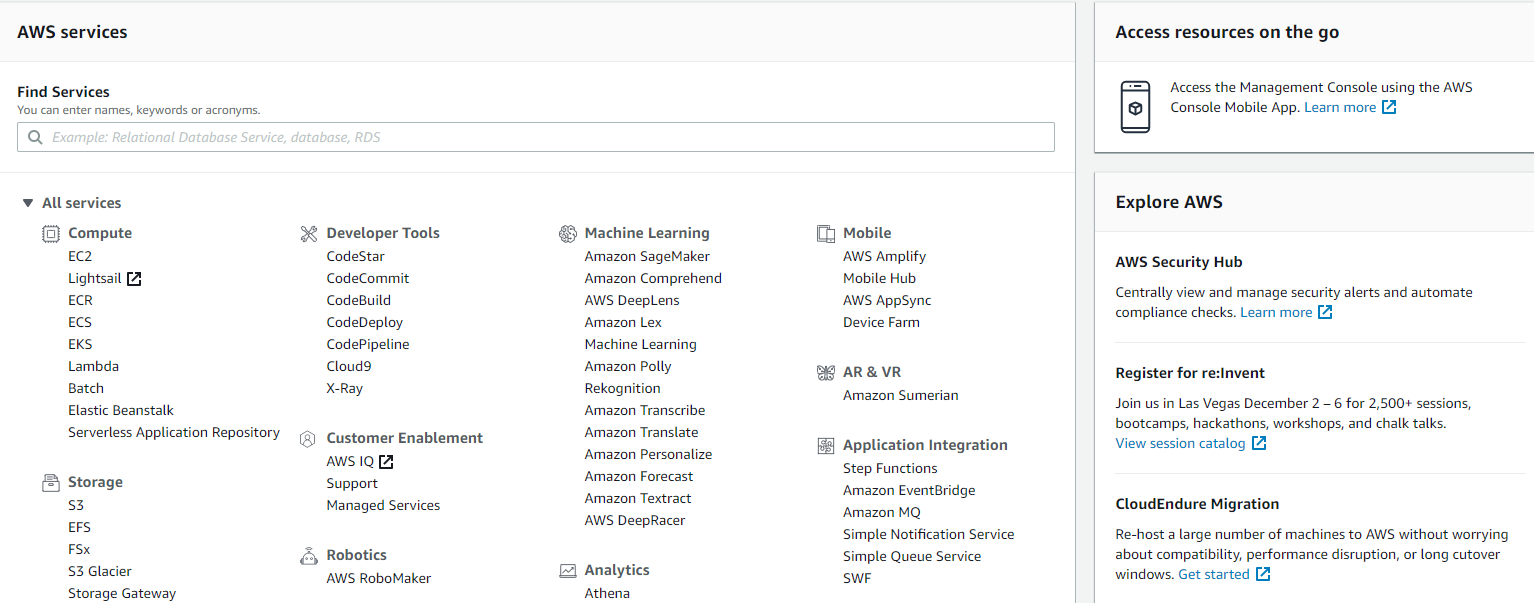
Remember that what you have created is a “master” account which is linked to the whole workspace for your “company”, as well as the contact and billing details for everything that you do (have no fear, you’re using the basic plan, remember).
Create the access credentials
All the services are protected at AWS, so to access them you need to provide some credentials..
We’ll use the IAM (Identity & Access Management) service to obtain these credentials which will allow us to manage the user accounts that we want and grant them the permissions that we need.
Therefore, we have to create a new user account and assign it the permissions to access the Amazon Rekognition service.
-
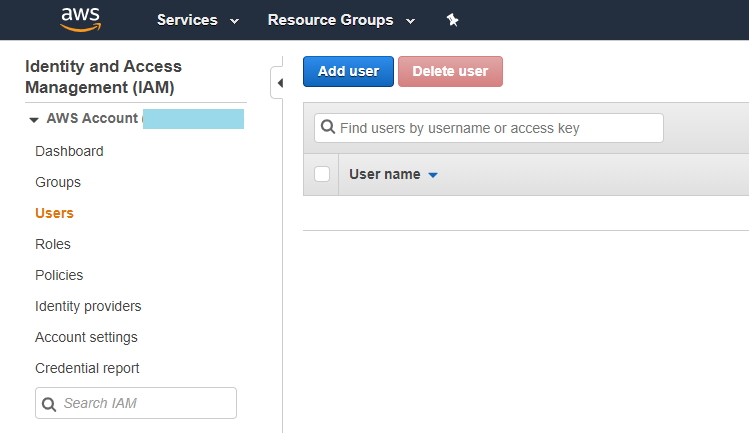
Access the IAM service
-
Create the User by selecting the option Users and then Add user(s).
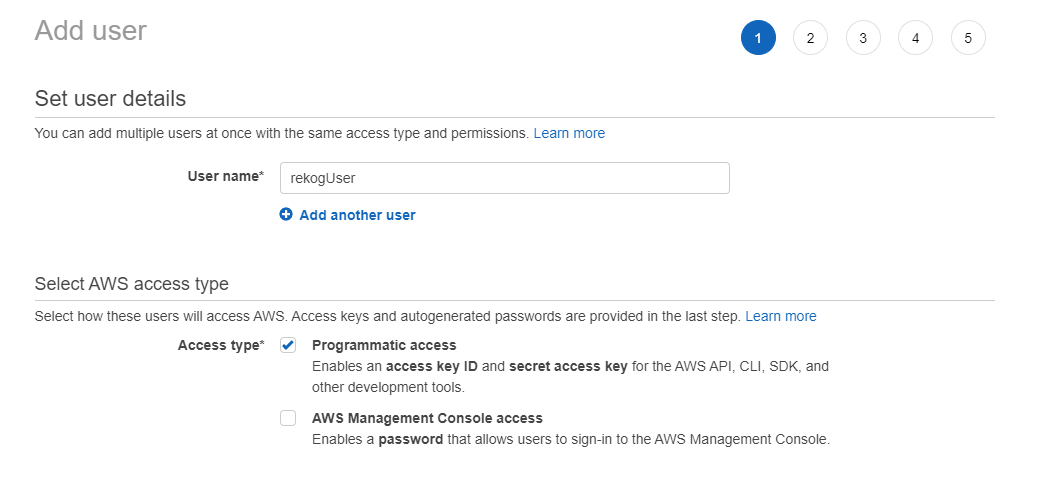
- From here, we’ll see a 5-step wizard. In the first step we name the user (e.g. rekogUser) , and indicate that the access type is Programmatic access, which will allow us to generate some access credentials.
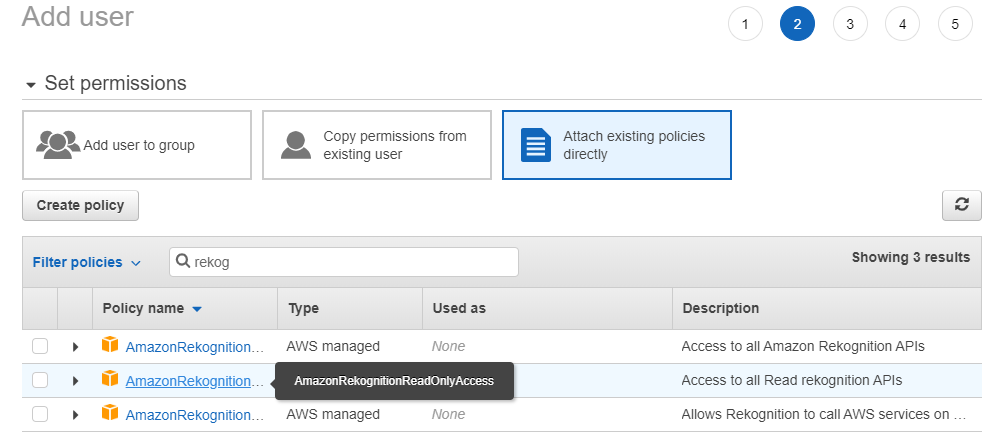
- Then, we’ll give the user permission for Rekognition service. To simplify, we’ll assign the policy to the user directly, without needing to create any group. Policies define access permissions to AWS services or resources. Because we want to access the Rekognition service for review, we’ll assign the AmazonRekognitionReadOnlyAccess policy to our user.
-
Once the policy is selected, continue through the wizard until you reach the summary and accept the details for creating the user.
-
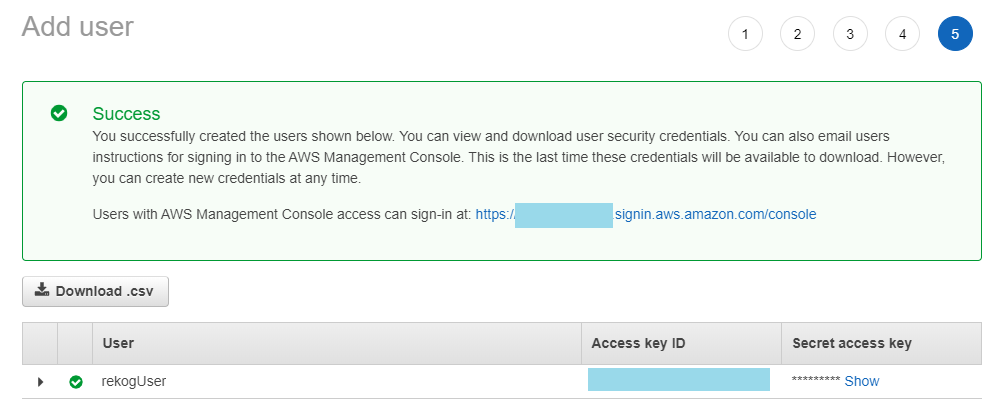
Once the user has been created, you’ll see the “Success” message together with the user created and its credentials. At this point, it’s important to save and note down both the Access Key ID and the Secret Access Key, as they will never be shown again. If, for any reason, you lose them you will have to create a new pair of keys for the user. We can download these keys in CSV format. We can also see the link to the management console that these users should use if they need to access the console (but this doesn’t apply to us)
SpringBoot
Accessing AWS occurs via an API Rest, so we can get direct access from our FrontEnd, but given that we’re going to need other services, we’ll create a middle-tier with SpringBoot which will centre all of the calls there. I’ll use IntelliJ, to develop this project although you can use whichever IDE you like best.
IntelliJ includes the Spring Initializr functionality, which facilitates the creation of our project. To use it, you simply need to create a new project (File -> New -> Project -> Spring Initializr). You can also use this service directly from the Spring Initializr website: https://start.spring.io

Insert the information that is requested to identify our project and its main features:
- Group: es.mimacom.demo
- Artifact: avatar
- Type: Maven Project
- Java version: 11
- Name: avatar
- Package: es.mimacom.demo.avatar
We won’t add any dependency, we’ll insert them by hand later.
To finish, we give the name to our project and the path where the code will be created.
Then, IntelliJ will create the SpringBoot project with the name “avatar”, where we can find the following characteristics:
- pom.xml file configured to use springboot
- AvatarApplication class with the main method, which is the initiator of the project.
- application.properties where we can configure the project features
Before we get down to business, we’ll add to the pom.xml file some dependencies that we need for the connection with AWS, lombok and the Springboot web starter:
- org.springframework.boot: spring-boot-starter-web
- com.amazonaws: aws-java-sdk:1.11.627
- com.amazonaws: aws-java-sdk-sts: 1.11.627
- com.amazonaws: aws-java-sdk-rekognition: 1.11.627
- org.projectlombok: lombok
Note: In order to use Lombok, it needs to be installed on your IDE. You can see the instructions at
https://projectlombok.org
Model
Our project model consists in a class with the attributes of the Avatar. To avoid problems with the values of the model, we’ll restrict the list of values for each attribute with an enum.
Lombok will create the access methods to our attributes.
package es.mimacom.demo.avatar.model;

import lombok.AllArgsConstructor;
import lombok.Builder;
import lombok.Data;
import lombok.NoArgsConstructor;
@Data
@NoArgsConstructor
@AllArgsConstructor
@Builder
public class Avatar {

    public enum AVATAR_STYLE {Circle, Transparent}

    public enum TOP {
        NoHair,
        Eyepatch,
        Hat,
        Hijab,
        Turban,
        WinterHat1,
        WinterHat2,
        WinterHat3,
        WinterHat4,
        LongHairBigHair,
        LongHairBob,
        LongHairBun,
        LongHairCurly,
        LongHairCurvy,
        LongHairDreads,
        LongHairFrida,
        LongHairFro,
        LongHairFroBand,
        LongHairNotTooLong,
        LongHairShavedSides,
        LongHairMiaWallace,
        LongHairStraight,
        LongHairStraight2,
        LongHairStraightStrand,
        ShortHairDreads01,
        ShortHairDreads02,
        ShortHairFrizzle,
        ShortHairShaggyMullet,
        ShortHairShortCurly,
        ShortHairShortFlat,
        ShortHairShortRound,
        ShortHairShortWaved,
        ShortHairSides,
        ShortHairTheCaesar,
        ShortHairTheCaesarSidePart
    }

    public enum ACCESSORIES {
        Blank,
        Kurt,
        Prescription01,
        Prescription02,
        Round,
        Sunglasses,
        Wayfarers
    }

    public enum HAIRCOLOR {
        Auburn,
        Black,
        Blonde,
        BlondeGolden,
        Brown,
        BrownDark,
        PastelPink,
        Platinum,
        Red,
        SilverGray
    }

    public enum FACIALHAIR {
        Blank,
        BeardMedium,
        BeardLight,
        BeardMagestic,
        MoustacheFancy,
        MoustacheMagnum
    }

    public enum CLOTHE {
        BlazerShirt,
        BlazerSweater,
        CollarSweater,
        GraphicShirt,
        Hoodie,
        Overall,
        ShirtCrewNeck,
        ShirtScoopNeck,
        ShirtVNeck
    }

    public enum CLOTHECOLOR {
        Black,
        Blue01,
        Blue02,
        Blue03,
        Gray01,
        Gray02,
        Heather,
        PastelBlue,
        PastelGreen,
        PastelOrange,
        PastelRed,
        PastelYellow,
        Pink,
        Red,
        White
    }

    public enum EYE {
        Close,
        Cry,
        Default,
        Dizzy,
        EyeRoll,
        Happy,
        Hearts,
        Side,
        Squint,
        Surprised,
        Wink,
        WinkWacky
    }

    public enum EYEBROW {
        Angry,
        AngryNatural,
        Default,
        DefaultNatural,
        FlatNatural,
        RaisedExcited,
        RaisedExcitedNatural,
        SadConcerned,
        SadConcernedNatural,
        UnibrowNatural,
        UpDown,
        UpDownNatural
    }

    public enum MOUTH {
        Concerned,
        Default,
        Disbelief,
        Eating,
        Grimace,
        Sad,
        ScreamOpen,
        Serious,
        Smile,
        Tongue,
        Twinkle,
        Vomit
    }

    public enum SKINCOLOR {
        Tanned,
        Yellow,
        Pale,
        Light,
        Brown,
        DarkBrown,
        Black
    }

    AVATAR_STYLE avatarStyle;
    TOP top;
    ACCESSORIES accessories;
    HAIRCOLOR hairColor;
    FACIALHAIR facialHair;
    CLOTHE clothe;
    CLOTHECOLOR clotheColor;
    EYE eye;
    EYEBROW eyebrow;
    MOUTH mouth;
    SKINCOLOR skinColor;

    public static Avatar getDefault() {
        Avatar avatar = Avatar.builder().build();
        avatar.setAvatarStyle(AVATAR_STYLE.Circle);
        avatar.setTop(TOP.Hat);
        avatar.setAccessories(ACCESSORIES.Wayfarers);
        avatar.setFacialHair(FACIALHAIR.Blank);
        avatar.setClothe(CLOTHE.BlazerShirt);
        avatar.setEye(EYE.Default);
        avatar.setEyebrow(EYEBROW.Default);
        avatar.setMouth(MOUTH.Default);
        avatar.setSkinColor(SKINCOLOR.Light);

        return avatar;
    }
}
Service
Before we begin to see the service code, we need to configure the credentials that we generated previously. We’ll put these credentials into the application.properties file in the following way:
- aws.region=us-east-2
- aws.accessKey= XXXXXX <-- Access Key ID
- aws.secretKey= YYYYYYY <-- Secret Access key
We can read these properties via the @Value annotation which will inject the property value indicated in the attribute preceded by this annotation.
Subsequently, we’ll configure the connection to AWS in a method annotated with @PostConstruct, which will guarantee that the properties have been read before the connection is established.
Now, all we need to do is our service method which will deal with:
- Obtaining the client file (the photo): We’ll adapt the MultipartFile file that we receive to the expected by AWS client: Image
- Calling the API DetectFaces of AWS Rekognition: Thanks to the AWS dependency, the AWS client handles the whole dark side of the call so it’s as simple as instantiating it and transferring the appropriate parameters
- Assembling the model of our Avatar: Here, whether the avatar looks like the original photo or not comes down to our expertise and dedication as we need to adapt the attributes received from AWS to the ones expected by Avataaar
To complete our class, we’ll create one more method that will return the list of possible values, so that, if the avatar doesn’t look like the original photo (most likely…), we’ll give the user the option of changing a key aspect, such as the hair colour or style.
package es.mimacom.demo.avatar.service;

import com.amazonaws.auth.AWSCredentials;
import com.amazonaws.auth.BasicAWSCredentials;
import com.amazonaws.regions.Region;
import com.amazonaws.regions.RegionUtils;
import com.amazonaws.services.rekognition.AmazonRekognition;
import com.amazonaws.services.rekognition.AmazonRekognitionClient;
import com.amazonaws.services.rekognition.AmazonRekognitionClientBuilder;
import com.amazonaws.services.rekognition.model.*;
import com.fasterxml.jackson.databind.ObjectMapper;
import es.mimacom.demo.avatar.model.Avatar;
import org.slf4j.Logger;
import org.slf4j.LoggerFactory;
import org.springframework.beans.factory.annotation.Value;
import org.springframework.stereotype.Service;
import org.springframework.web.multipart.MultipartFile;

import javax.annotation.PostConstruct;
import java.io.IOException;
import java.nio.ByteBuffer;
import java.util.ArrayList;
import java.util.Comparator;
import java.util.List;
import java.util.stream.Collectors;
import java.util.stream.Stream;


@Service
public class AvatarService {

    private AmazonRekognition rekognitionClient;
    private static Logger logger = LoggerFactory.getLogger(AvatarService.class);

    @Value("${aws.accessKey}")
    private String accessKey;
    @Value("${aws.secretKey}")
    private String secretKey;
    @Value("${aws.region}")
    private String region;

    @PostConstruct
    private void initializeAmazon() {
        AWSCredentials credentials = new BasicAWSCredentials(this.accessKey, this.secretKey);
        rekognitionClient = new AmazonRekognitionClient(credentials);
        rekognitionClient.setRegion(RegionUtils.getRegion(region));
    }


    public List<String> getList(String id) {
        logger.debug("Obtaining list for: " + id);
        switch (id) {
            case "TOP":
                return Stream.of(Avatar.TOP.values()).map(Avatar.TOP::name).collect(Collectors.toList());
            case "ACCESSORIES":
                return Stream.of(Avatar.ACCESSORIES.values()).map(Avatar.ACCESSORIES::name).collect(Collectors.toList());
            case "HAIRCOLOR":
                return Stream.of(Avatar.HAIRCOLOR.values()).map(Avatar.HAIRCOLOR::name).collect(Collectors.toList());
            case "FACIALHAIR":
                return Stream.of(Avatar.FACIALHAIR.values()).map(Avatar.FACIALHAIR::name).collect(Collectors.toList());
            case "CLOTHE":
                return Stream.of(Avatar.CLOTHE.values()).map(Avatar.CLOTHE::name).collect(Collectors.toList());
            case "CLOTHECOLOR":
                return Stream.of(Avatar.CLOTHECOLOR.values()).map(Avatar.CLOTHECOLOR::name).collect(Collectors.toList());
            case "EYE":
                return Stream.of(Avatar.EYE.values()).map(Avatar.EYE::name).collect(Collectors.toList());
            case "EYEBROW":
                return Stream.of(Avatar.EYEBROW.values()).map(Avatar.EYEBROW::name).collect(Collectors.toList());
            case "MOUTH":
                return Stream.of(Avatar.MOUTH.values()).map(Avatar.MOUTH::name).collect(Collectors.toList());
            case "SKINCOLOR":
                return Stream.of(Avatar.SKINCOLOR.values()).map(Avatar.SKINCOLOR::name).collect(Collectors.toList());
            default:
                return new ArrayList<String>();
        }
    }

    public Avatar generateAvatar(MultipartFile multipartFile) {
        Avatar avatar = Avatar.getDefault();
        try {
            logger.debug("Preparing avatar for image:" + multipartFile.getName());
            Image image = new Image().withBytes(ByteBuffer.wrap(multipartFile.getBytes()));
            DetectFacesResult faceResult = awsDetectFaces(image, Attribute.ALL);
            if (faceResult.getFaceDetails() != null && faceResult.getFaceDetails().size() > 0) {
                FaceDetail face = faceResult.getFaceDetails().get(0);
                avatar = buildAvatar(face);
                if (logger.isDebugEnabled()) {
                    ObjectMapper objectMapper = new ObjectMapper();
                    logger.debug("Face features:");
                    logger.debug(objectMapper.writerWithDefaultPrettyPrinter().writeValueAsString(face));
                }
            } else {
                logger.debug("No face detected by Rekognition");
            }

            if (logger.isDebugEnabled()) {
                ObjectMapper objectMapper = new ObjectMapper();
                logger.debug("Avatar features:");
                logger.debug(objectMapper.writerWithDefaultPrettyPrinter().writeValueAsString(avatar));
            }
        } catch (IOException e) {
            e.printStackTrace();
        }

        return avatar;
    }

    private DetectFacesResult awsDetectFaces(Image image, Attribute attributes) {
        DetectFacesRequest request = new DetectFacesRequest()
                .withImage(image)
                .withAttributes(attributes);
        return rekognitionClient.detectFaces(request);
    }


    private Avatar buildAvatar(FaceDetail face) {
        //TODO: Give your creativity a chance
        return null;
    }
}
Controller
Finally, all that we need to do is publish the API. To do this, we’ll create a new AvatarController class which will receive the client requests, redirect to the corresponding service and create the response in JSON format.
To avoid CORS problems, we’ll give universal access to our api ('*')
package es.mimacom.demo.avatar.controller;

import es.mimacom.demo.avatar.model.Avatar;
import es.mimacom.demo.avatar.service.AvatarService;
import org.springframework.beans.factory.annotation.Autowired;
import org.springframework.web.bind.annotation.*;
import org.springframework.web.multipart.MultipartFile;

import java.util.List;

@CrossOrigin(origins = "*", methods= {RequestMethod.GET,RequestMethod.POST})
@RestController
@RequestMapping("/api")
public class AvatarController {

    @Autowired
    private AvatarService avatarService;

    @PostMapping("/uploadFile")
    public Avatar uploadFile(@RequestPart(value = "file") MultipartFile photo) {
        return this.avatarService.generateAvatar(photo);
    }

    @GetMapping("/list/{id}")
    public List<String> getList(@PathVariable String id) {
        return this.avatarService.getList(id);
    }
}
React
In order to start working with React, we’ll need to install a node.js package manager. I’ll use YARN in this example but you can use any package manager that you already have installed.
First, we’ll create our application:
yarn create react-app avatar-app
We’ll also install some dependencies that we’ll use in the project
yarn add reactstrap react-dom bootstrap avataaars
This will create the whole basic structure for us in order to begin our application. We can test it by running the following command and, in a browser, accessing http://localhost:3000
yarn start
We can load our React project with the same intelliJ and edit/save everything that we need. The server will detect the changes and update them on the fly so you don’t need to reboot.
ImageUpload Component
First, we’ll create our image loading component. What do we want from this component?
- A button that allows us to load an image from the local storage
- A preview of the image: We’ll need to know if an image has been selected or not in order to preview it or not
- A button that allows us to perform an action on the photo: We’ll make the component reusable, allowing this action to be personalised by the parent component
- A reset button which cleans the status of the component
We’ll create our component in the folder: src/imageUpload. This way, we can put all of the files that make up the component (css, js, …) into this folder.
import React, { Component } from 'react';
import {Form, Button, Input, Label} from 'reactstrap'
import 'bootstrap/dist/css/bootstrap.min.css'
import './ImageUpload.css'

class ImageUpload extends Component {

    constructor(props) {
        super(props);
        this.state = {
            file: '',
            imagePreviewUrl: '',
            onSubmit: this.props.onSubmit
        };
        this._handleImageChange = this._handleImageChange.bind(this);
        this._handleReset = this._handleReset.bind(this);
    }

    _handleImageChange(e) {
        e.preventDefault();

        let reader = new FileReader();
        let file = e.target.files[0];

        reader.onloadend = () => {
            this.setState({
                file: file,
                imagePreviewUrl: reader.result
            });
        }
        reader.readAsDataURL(file)
    }

    _handleReset(e) {
        e.preventDefault();

        this.setState({
            file: '',
            imagePreviewUrl: ''
        })
    }

    render() {
        let state = this.state;
        let $imagePreview = null;
        if (state.imagePreviewUrl != '') {
            $imagePreview = (
                <div>
                    <div className="image-container">
                        <img src={state.imagePreviewUrl} alt="Your Photo"/>
                    </div>
                    <p/>
                    <div>
                        <Button color="primary" onClick={() => this.state.onSubmit(this.state.file)}>Analyze Image</Button>
                        {' '}
                        <Button color="danger" onClick={this._handleReset}>Reset Iamge</Button>
                    </div>
                    <p/>
                </div>)
        }

        return (
            <div>
                <Form onSubmit={this._handleSubmit}>
                    <Label className="file-upload btn-primary">
                        <Input type="file" id="photo" onChange={this._handleImageChange} key={this.state.file}/>
                        <i className="fa fa-cloud-upload>"/>Upload your photo
                    </Label>
                    <div>
                        {$imagePreview}
                    </div>
                </Form>
            </div>
        )
    }
}
export default ImageUpload;
By analysing the code, we can see that the status is made up of 3 attributes:
- The file, if it is selected
- The URL of the image
- The action of the button that can be customised
We’ll leave in blank these attributes in the constructor, except for the button action which we’ll receive from the component’s input parameters. We’ll also have 2 more buttons which we’ll manage with the actions.
- _handleImageChange: Manage the selection of a photo to activate its preview
- _handleReset: Delete the photo and clear the preview
You can check whether a photo has been selected in the render of the component, in which case we’ll see the preview and actions block.
Avatar Component
Our Avatar component will be based on the existing Avataaars. It will show an image with the Avatar created by our service wrote in Java, but it will also have a form that should allow us to modify its characteristics, in case there is any characteristic that we need to add (e.g. hat, t-shirt, hair, …) and the AWS service can’t recognise.
To implement this component, we must consider what we need to manage:
- The attributes of the Avatar
- The possible values for each attribute
And we’ll identify the only action that can be carried out in the component: redrawing the avatar each time that an attribute changes
import React, {Component} from 'react';
import {Col, Form, FormGroup, Input, Label} from 'reactstrap';
import Avatar from "avataaars";

class AvatarComponent extends Component {

    avatarProperties = ["TOP", "ACCESSORIES", "HAIRCOLOR", "FACIALHAIR", "CLOTHE", "CLOTHECOLOR", "EYE", "EYEBROW", "MOUTH", "SKINCOLOR"];

    constructor(props) {
        super(props);
        if (this.props.avatar) {
            this.state = {
                avatar: this.props.avatar,
                TOP: [],
                ACCESSORIES: [],
                HAIRCOLOR: [],
                FACIALHAIR: [],
                CLOTHE: [],
                CLOTHECOLOR: [],
                EYE: [],
                EYEBROW: [],
                MOUTH: [],
                SKINCOLOR: []
            }
        }
        this._handleChange = this._handleChange.bind(this);
    }

    fetchList(id) {
        const upstream = "http://localhost:8080/api/list/" + id;
        return fetch(upstream)
            .then((results) => results.json())
    }

    componentDidMount(): void {
        for (const property of this.avatarProperties) {
            this.fetchList(property).then(data => this.setState({[property]: data}))
        }
    }

    componentWillReceiveProps(nextProps: Readonly<P>, nextContext: any): void {
        this.setState({avatar: nextProps.avatar})
    }

    _handleChange(event) {
        const target = event.target;
        const value = target.value;
        const name = target.name;
        let avatar = {...this.state.avatar};
        avatar[name] = value;
        this.setState({avatar: avatar});
    }

    render() {
        const {avatar} = this.state;

        return <div>
            <div>
                <Avatar
                    style={{width: '150px', height: '150px'}}
                    avatarStyle={avatar.avatarStyle}
                    topType={avatar.top}
                    accessoriesType={avatar.accessories}
                    hairColor={avatar.hairColor}
                    facialHairType={avatar.facialHair}
                    clotheType={avatar.clothe}
                    clotheColor={avatar.clotheColor}
                    eyeType={avatar.eye}
                    eyebrowType={avatar.eyebrow}
                    mouthType={avatar.mouth}
                    skinColor={avatar.skinColor}
                />
            </div>
            <p/>
            <div>
                <Form horizontal>
                    <FormGroup row>
                        <Col sm={3}>
                            <Label for="avatarStyle">Avatar Style</Label>
                        </Col>
                        <Col sm={2}>
                            <Input type="radio" name="avatarStyle" id="avatarStyle" value="Circle"
                                   checked={(avatar.avatarStyle === "Circle") ? "checked" : ""}
                                   onChange={this._handleChange}/> Circle
                        </Col>
                        <Col sm={2}>
                            <Input type="radio" name="avatarStyle" id="avatarStyle" value="Transparent"
                                   checked={(avatar.avatarStyle === "Transparent") ? "ckecked" : ""}
                                   onChange={this._handleChange}/> Transparent
                        </Col>
                    </FormGroup>
                    <FormGroup row>
                        <Col sm={3}>
                            <Label for="top">Top</Label>
                        </Col>
                        <Col sm={4}>
                            <Input type="select" name="top" id="top" className="form-control" defaultValue={avatar.top}
                                   value={avatar.top} onChange={this._handleChange.bind(this)}>
                                {this.state.TOP.map((element) => {return <option value={element}>{element}</option>})}
                            </Input>
                        </Col>
                    </FormGroup>
                    <FormGroup row>
                        <Col sm={3}>
                            <Label for="accesories">Accesories</Label>
                        </Col>
                        <Col sm={4}>
                            <Input type="select" name="accessories" id="accessories" className="form-control"
                                   defaultValue={avatar.accessories} value={avatar.accessories}
                                   onChange={this._handleChange.bind(this)}>
                                {this.state.ACCESSORIES.map((element) => {return <option value={element}>{element}</option>})}
                            </Input>
                        </Col>
                    </FormGroup>
                    <FormGroup row>
                        <Col sm={3}>
                            <Label for="hairColor">Hair Color</Label>
                        </Col>
                        <Col sm={4}>
                            <Input type="select" name="hairColor" id="hairColor" className="form-control"
                                   defaultValue={avatar.hairColor} value={avatar.hairColor}
                                   onChange={this._handleChange.bind(this)}>
                                {this.state.HAIRCOLOR.map((element) => {return <option value={element}>{element}</option>})}
                            </Input>
                        </Col>
                    </FormGroup>
                    <FormGroup row>
                        <Col sm={3}>
                            <Label for="facialHair">Facial Hair</Label>
                        </Col>
                        <Col sm={4}>
                            <Input type="select" name="facialHair" id="facialHair" className="form-control"
                                   defaultValue={avatar.facialHair} value={avatar.facialHair}
                                   onChange={this._handleChange.bind(this)}>
                                {this.state.FACIALHAIR.map((element) => {return <option value={element}>{element}</option>})}
                            </Input>
                        </Col>
                    </FormGroup>
                    <FormGroup row>
                        <Col sm={3}>
                            <Label for="clothe">Clothes</Label>
                        </Col>
                        <Col sm={4}>
                            <Input type="select" name="clothe" id="clothe" className="form-control"
                                   defaultValue={avatar.clothe} value={avatar.clothe}
                                   onChange={this._handleChange.bind(this)}>
                                {this.state.CLOTHE.map((element) => {return <option value={element}>{element}</option>})}
                            </Input>
                        </Col>
                    </FormGroup>
                    <FormGroup row>
                        <Col sm={3}>
                            <Label for="clotheColor">Clothes color</Label>
                        </Col>
                        <Col sm={4}>
                            <Input type="select" name="clotheColor" id="clotheColor" className="form-control"
                                   defaultValue={avatar.clotheColor} value={avatar.clotheColor}
                                   onChange={this._handleChange.bind(this)}>
                                {this.state.CLOTHECOLOR.map((element) => {return <option value={element}>{element}</option>})}
                            </Input>
                        </Col>
                    </FormGroup>
                    <FormGroup row>
                        <Col sm={3}>
                            <Label for="eye">Eyes</Label>
                        </Col>
                        <Col sm={4}>
                            <Input type="select" name="eye" id="eye" className="form-control" defaultValue={avatar.eye}
                                   value={avatar.eye} onChange={this._handleChange.bind(this)}>
                                {this.state.EYE.map((element) => {return <option value={element}>{element}</option>})}
                            </Input>
                        </Col>
                    </FormGroup>
                    <FormGroup row>
                        <Col sm={3}>
                            <Label for="eyebrow">Eyebrow</Label>
                        </Col>
                        <Col sm={4}>
                            <Input type="select" name="eyebrow" id="eyebrow" className="form-control"
                                   defaultValue={avatar.eyebrow} value={avatar.eyebrow}
                                   onChange={this._handleChange.bind(this)}>
                                {this.state.EYEBROW.map((element) => {return <option value={element}>{element}</option>})}
                            </Input>
                        </Col>
                    </FormGroup>
                    <FormGroup row>
                        <Col sm={3}>
                            <Label for="mouth">Mouth</Label>
                        </Col>
                        <Col sm={4}>
                            <Input type="select" name="mouth" id="mouth" className="form-control"
                                   defaultValue={avatar.mouth} value={avatar.mouth}
                                   onChange={this._handleChange.bind(this)}>
                                {this.state.MOUTH.map((element) => {return <option value={element}>{element}</option>})}
                            </Input>
                        </Col>
                    </FormGroup>
                    <FormGroup row>
                        <Col sm={3}>
                            <Label for="skinColor">Skin</Label>
                        </Col>
                        <Col sm={4}>
                            <Input type="select" name="skinColor" id="skinColor" className="form-control"
                                   defaultValue={avatar.skinColor} value={avatar.skinColor}
                                   onChange={this._handleChange.bind(this)}>
                                {this.state.SKINCOLOR.map((element) => {return <option value={element}>{element}</option>})}
                            </Input>
                        </Col>
                    </FormGroup>
                </Form>
            </div>
        </div>
    }
}

export default AvatarComponent;
The constructor can receive the avatar’s attributes. This is because each time that we analyse a photo with our Java service, the component will receive the result of that analysis in JSON form with the Avatar’s attributes.
We load the LOVs in the componentDidMount action which, in accordance with the React life-cycle, is evoked after the render method but before the component is presented to the user.
In the input fields of our form, we’ll see how to assemble the list of “options” with the list of values that we have obtained from the server. Also, we’ll associate the _handleChange function to each Input. This function will run each time that a different option is chosen from each selector.
Here, we’ll get the value selected by the user, we’ll take the avatar object from the status and update the value of the attribute selected. This will automatically be reflected in the avatar as we’re updating the status of the component by invoking the setState function.
Finally, we have the componentWillReceiveProps function which allows us to update the status of the Avatar each time that the status of the parent component changes. This will allow us to update the status each time that we analyse a photograph.
App Component
Now all that we need to do is bring everything together, and we’ll do this in App.js, which will be our integrating component for the 2 previous components that we have created.
On the one hand, we’ll use the ImageUpload component, to which we’ll pass the action to be run as a parameter. We’ll define this action here and its function will be to send the photo to the server and receive the response in the form of Avatar attributes. We’ll save this response in the status of our App component.
On the other hand, we’ll use the AvatarComponent component, to which we’ll transfer the attributes of the Avatar using the status of this component. First, we’ll transfer some default attributes. When we receive the response from the server, we’ll update the App status. When the status is updated, the AvatarComponent will be notified automatically and will run its componentWillReceiveProps function.
import React, {Component} from 'react';
import './App.css';
import {Col, Container, Row, NavLink} from 'reactstrap';
import ImageUpload from "./imageUpload/ImageUpload";
import AvatarComponent from "./avatar/AvatarComponent";
class App extends Component {
upstream = "http://localhost:8080/api/uploadFile"
defaultAvatar = {
avatarStyle: 'Circle',
top: 'LongHairMiaWallace',
accessories: 'Prescription02',
hairColor: 'BrownDark',
facialHair: 'Blank',
clothe: 'Hoodie',
clotheColor: 'PastelBlue',
eye: 'Happy',
eyebrow: 'Default',
mouth: 'Smile',
skinColor: 'Light'
}
constructor(props) {
super(props);
this.state = {
avatar: this.defaultAvatar
}
this._handleSubmit = this._handleSubmit.bind(this);
}
_handleSubmit(component) {
const formData = new FormData();
formData.append('file', component);
const config = {
headers: {
'content-type': 'multipart/form-data'
}
}
fetch(this.upstream, {
method: 'POST',
config: config,
body: formData
}
)
.then((response) => {
return response.json()
})
.then((response) => {
let avatar = {...response};
this.setState({avatar})
})
}
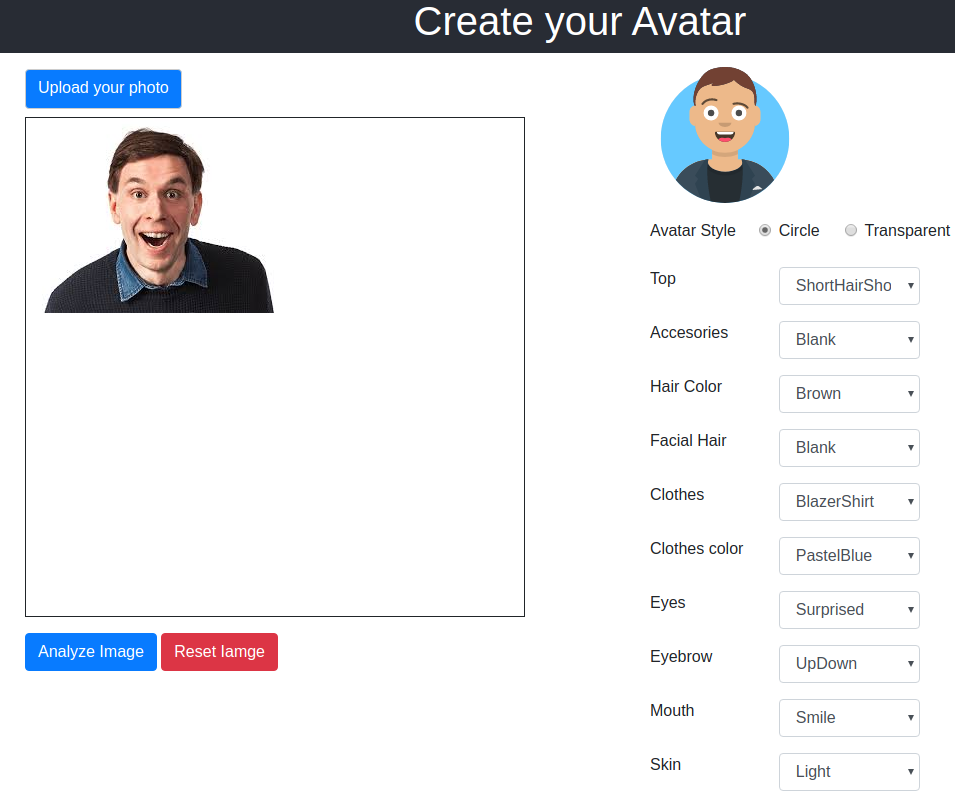
render() {
return (
<div className="App">
<header className="App-header">
<h1>Create your Avatar</h1>
</header>
<body>
<Container className="page-wrap">
<Row>
<Col>
<p/>
<ImageUpload onSubmit={this._handleSubmit}/>
</Col>
<Col sm={1}/>
<Col>
<AvatarComponent avatar={this.state.avatar}/>
</Col>
</Row>
</Container>
</body>
<footer className="App-footer">
<NavLink href="https://www.mimacom.com">Mimacom</NavLink>
</footer>
</div>
)
}
}
export default App;
Result
It’s time to try it all out...
Launch the Backend component
./mvnw spring-boot:run
Launch the Frontend component
yarn start
And here are the results obtained... How about that?
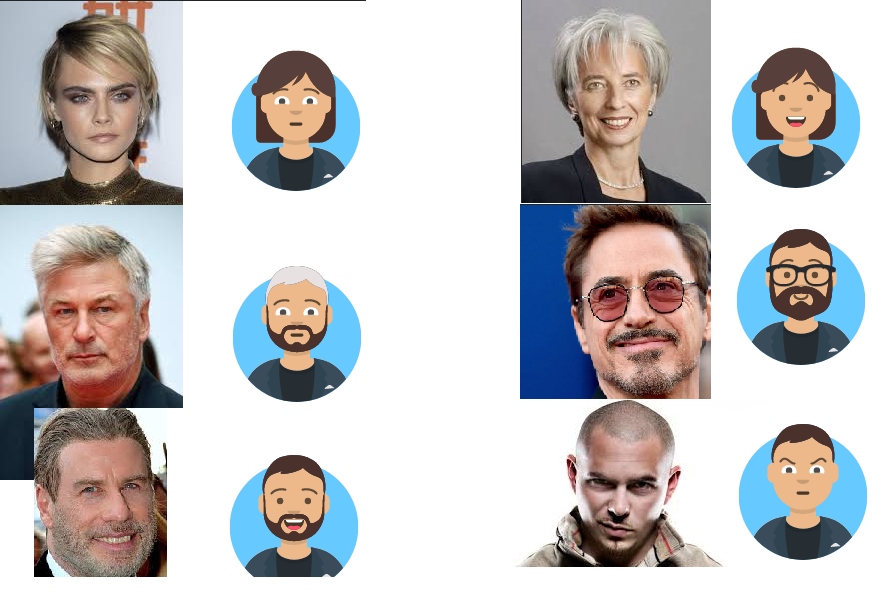
AWS Rekognition still has some way to go in order to give a positive result for our purpose, especially in terms of hair recognition, something which is offered by Azure.
AWS is unable to detect baldness, hair colour, or if the person has long hair or not. But, as the saying goes... all things in good time.