A quick dive into NestJS
Back in july I participated in JSCamp, a two day event focused on javascript-based technologies. Between all the awesome frontend stuff I saw there, there was one framework who really woke up the backend guy that lives inside of me.
The aim of this post is to make a small introduction into the basics of NestJS, with some thoughts for backend developers who have basic knowledge about current frontend state of the art.
Not another backend framework
As a full-stack developer I've always been keen to bring both frontend and backend worlds together, but it has never been this close. NestJS mixes what makes good frontend frameworks nowadays, with the things that made the backend frameworks excel in the good-old times.
Built on top of NodeJS, Express and typescript, keeps the heritage of the performance and scalability of JS application without compromising complexity that somehow backend applications always carried.
Elements of OOP (Object Oriented Programming) and FP (Functional Programming) are bound to it's DNA, which mainly focus in solving one thing other backend libraries for NodeJS didn't solve: Architecture.
Thanks to typescript, most of the backend developers will be able to identify at first glance some similarities with the code they write. We will explore the architectural similarities on the next paragraphs.
Core fundamentals
NestJS makes heavy usage of decorators, which define and identify the different types of components we might have. An small but representative subset of the available NestJS decorators follows this paragraph.
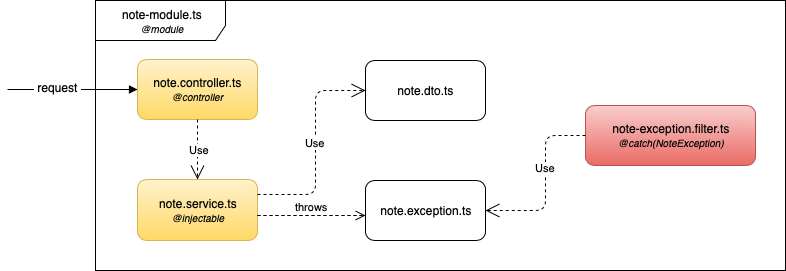
@Controller, responsible for handling incoming requests and returning responses to the client. Usually includes several endpoints triggered using standard HTTP requests.@Catch, also known as exception filters. A simple, generic approach for handling concrete exceptions thrown by the controllers.@Injectable, or every component which can be injected in other classes. For example, a service used in some different controllers.@Module, a single way of aggregating related components.
As the most common backend frameworks, IOC design principle as Dependency Injection also plays an important role, bridging the different layers we create to structure our application.
Part of the foundation also comes with some advanced concepts, expressed as components and methods, that can be applied across the implementation. As a reference we will quickly go through all of them.
- Pipes, used to easily transform and validate input data.
- Guards, like Angular counterparts decide whether or not the navigation to an specific route should be allowed.
- Middleware, low level function executed before route-handler which can be used to execute any code over the incoming request.
- Interceptors, AOP-oriented components used to bind extra logic before or after controller method execution.
First steps with NestJS
In order to see how this concepts work together we're going to do an small proof of concept for managing notes. The service we're going to design will expose an API with the usual Create, Read and Delete operations using standard HTTP methods.
The next figure represents the structure of the module we're going to build. Don't worry if you don't get the full concept right now, because we're going to walk through the code component by component.
Project setup
We'll start setting up the base project: We assume you have node and npm installed on the local machine so we'll just run npm i -g @nestjs/cli to install the NestJS CLI.
As Angular's CLI, it features scaffolding utilities for both project level and component level. We'll create our own project by running nest new notes-project.
During this creation process some information about the project might be asked, but most importantly, the package manager you want to use. For the purpose of this demo we'll stick with npm.
Before creating new components we're going to take a look on the project structure that has been setup with the execution of this command. If you worked recently on frontend projects this might be familiar for you.
┌── package.json
├── src
│   ├── app.controller.spec.ts
│   ├── app.controller.ts
│   ├── app.module.ts
│   ├── app.service.ts
│   └── main.ts
├── test
│   ├── app.e2e-spec.ts
│   └── jest-e2e.json
├── tsconfig.build.json
├── tsconfig.json
├── tsconfig.spec.json
└── tslint.json
In a similar fashion to other modern JS projects, basic config files have been setup for typescript and npm on the root folder. On the other hand, we've src folder containing sources of our app, and test folder, with test config files which are out of the scope of this small introduction.
The source folder of our project contains the base app module which include the controllers and providers that are part of our base module.
At this point you should have a complete and executable NestJS empty project, we'll start our local node.js server using npm run start. By default server uses port 3000, if we point the browser of your choice to http://localhost:3000 we should get a nice Hello world.
Component structure
With our project ready, the next step will be to create the different components and modules that will compose our notes backend service.
We'll start by creating the note module using NestJS CLI by running on our project root nest generate module note. This command will create the new module and link it on the base app module which is used to bootstrap the application.
Next step will be to start creating the actual components under the newly generated module. Our first candidate will be the note-service, we'll generate it by running nest generate service note.
Following the same approach, we'll create the remaining components of our app.
$> nest generate class note note/dto
$> nest generate class note.exception note/exception
$> nest generate filter note-exception note/filter
$> nest generate controller note
The final note module structure show look similar to the next figure:
┌── dto
│   ├── note.spec.ts
│   └── note.ts
├── exception
│   ├── note.exception.spec.ts
│   └── note.exception.ts
├── filter
│   ├── note-exception.filter.spec.ts
│   └── note-exception.filter.ts
├── note.controller.spec.ts
├── note.controller.ts
├── note.module.ts
├── note.service.spec.ts
└── note.service.ts
Building our service
The only thing left now is to fill all those placeholder classes with some real content. We'll ignore every *spec.ts file, as they are test definitions which are out of the scope of this small introduction.
First component we're going to complete is our dto, note.ts. We'll edit it to feature both id and content.
export class Note {
    public id : number;
    public content : string;
}
Then, we're going to fill our exception class, note.exception.ts, making it inherit typescript error class.
export class NoteException extends Error {
    constructor(public readonly message = ``) {
        super();
    }

    public what(): string {
        return this.message;
    }
}
Next step will be to setup our exception filter, note-exception.filter.ts which is in charge of handling the response when our app throws the exception we've just defined.
For demo purposes we'll make it return always HTTP error 500, and include exception message as a json in the body of the response.
import { ArgumentsHost, Catch, ExceptionFilter } from '@nestjs/common';
import { NoteException } from '../exception/note.exception';

@Catch(NoteException)
export class NoteExceptionFilter implements ExceptionFilter {
  catch(exception: NoteException, host: ArgumentsHost) {

    const ctx = host.switchToHttp();
    const response = ctx.getResponse();

    response
      .status(500)
      .json({
        timestamp: new Date().toISOString(),
        msg: exception.what()
      });
  }
}
So far so good! We'll write now our note service, note.service.ts, which keeps track of the different notes we push to our API and raises exceptions when any unexpected behaviour happens.
import { Injectable } from '@nestjs/common';
import { Note } from './dto/note';
import { NoteException } from './exception/note.exception';

@Injectable()
export class NoteService {
    private notes : Note[] = [];

    public getNotes(): Note[]{
        return this.notes;
    }

    public addNote(content : string): Note {
        if (!content || content.length === 0){
            throw new NoteException('Note is empty!');
        }

        const newNote = { id: this.generateId(), content };
        this.notes.push(newNote)

        return newNote;
    }

    public removeNote(id : number): void {
        const resultingArray: Note[] = this.notes.filter(note => note.id !== id);

        if (resultingArray.length === this.notes.length){
            throw new NoteException('No note found');
        }

        this.notes = resultingArray;
    }

    private generateId(): number {
        const currentSize = this.notes.length;
        if (!currentSize){
            return 0;
        }

        return this.notes[currentSize - 1].id + 1;
    }
}
Last but not least, we're going to write our controller. The point of entry of our application which will expose our API for managing Notes. Content of note.controller.ts follows this line.
import { Controller, Get, Post, Body, Delete, Param, UseFilters } from '@nestjs/common';
import { NoteService } from './note.service';
import { Note } from './dto/note'
import { NoteExceptionFilter } from './filter/note-exception.filter';

@Controller('note')
@UseFilters(new NoteExceptionFilter())
export class NoteController {

    constructor(private readonly noteService: NoteService) {}

    @Get()
    public findAll(): Note[] {
        return this.noteService.getNotes();
    }

    @Post()
    public create(@Body() note: Note): Note {
        return this.noteService.addNote(note.content);
    }

    @Delete(':id')
    public delete(@Param('id') id: number): void {
        this.noteService.removeNote(id);
    }
}
This might be the most interesting component of our application since it features Dependency Injection on constructor level and uses decorators for exposing the different HTTP methods available under the /note endpoint.
Beware of the usage of @UseFilter decorator on class definition, as it makes our exception filter visible for NestJS, attaching it to the lifecycle of requests for this controller.
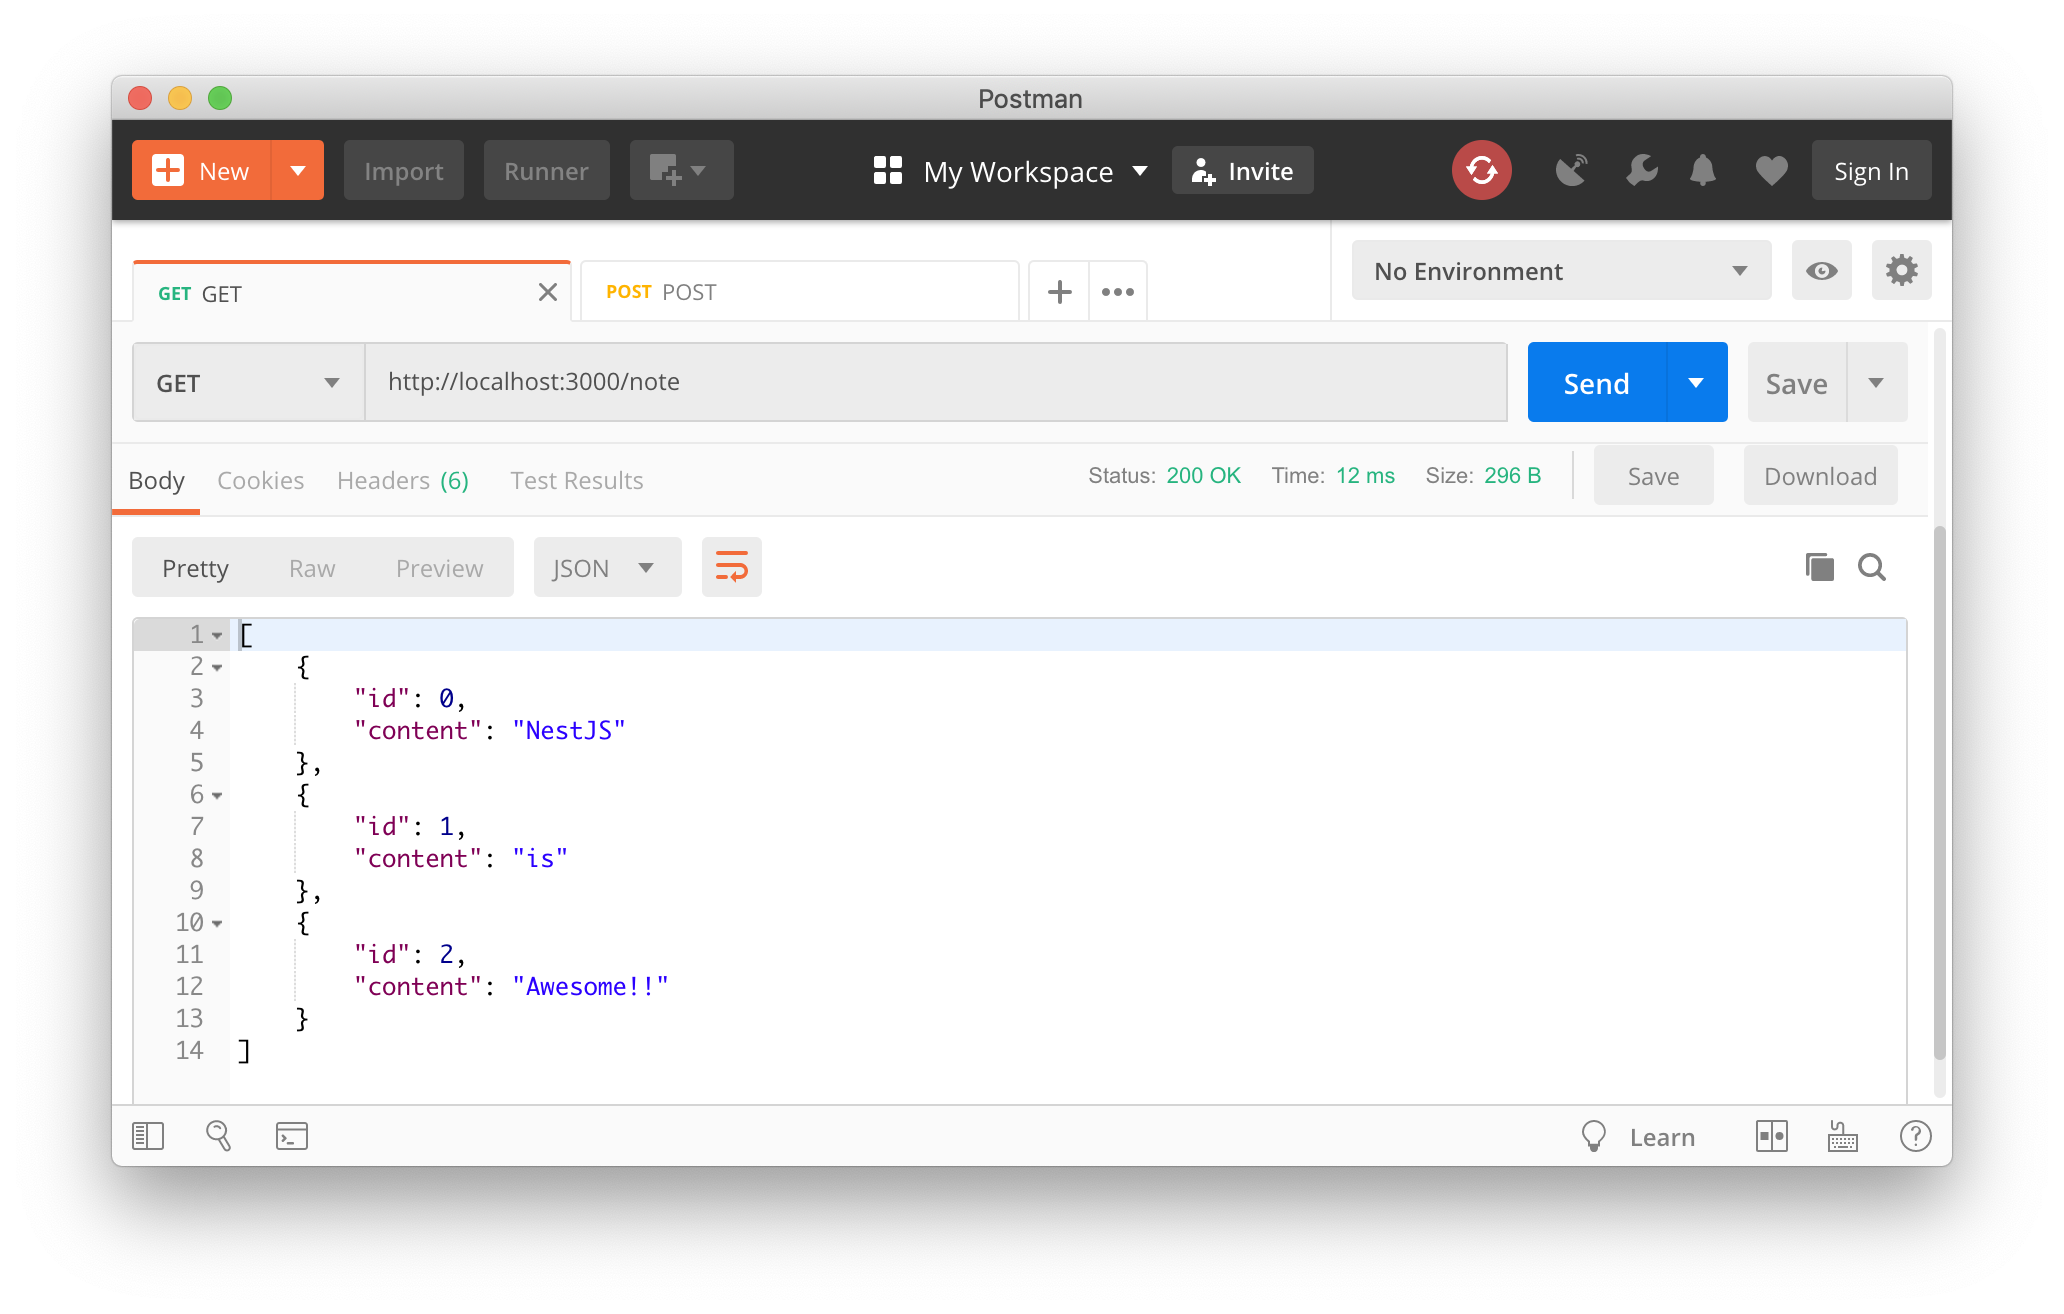
The only thing remaining is to try what we built, just run again npm run start and point postman or another similar tool to http://localhost:3000/note to play around our brand-new API.
Closing thoughts
We just grasped the surface on what NestJS has to offer. If you feel eager to learn more about this framework and the envision behind it I really recommend taking a look to Kamil Myśliwiec talk at JSCamp 2018.
The official documentation is also a good point of start for any developer who wants to introduce on this framework and is available on the NestJS project page.