Building an ETL pipeline for Jira
This is the first part of a two-part blog post that is concerned with extracting data from Jira and using it for further applications such as visualization, evaluation, and using the power of machine learning to gain valuable insights in the data.
Introduction
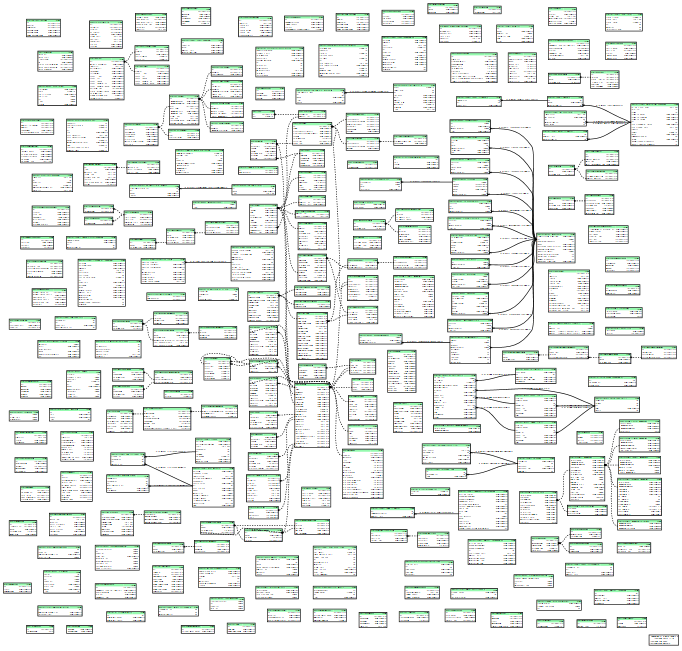
Jira is an issue tracking product with capabilities for agile project management, bug tracking, time logging and much more. mimacom has been using Jira for more than ten years now to manage its projects, so there is a sizeable amount of valuable data available in mimacom's Jira database. However, since its introduction in mimacom ten years ago, there were several big updates to the Jira product, and the way it is used to manage projects changed from update to update (e.g. introduction of new functionality like epics, sprints, components, etc.). For these reasons, the Jira data does not provide a very consistent record reflecting mimacom's history in managing projects. Data fields are often unstructured and almost exclusively in textual form. Even the language differs for some projects, although it can be narrowed down to mostly German and English. Additionally, Jira allows the creation of custom fields, which provide more flexibility at the cost of a very generic yet complex relational data model that has continuously evolved since the initial release of the Jira product in 2002.
 Jiras entity relationship diagram
In this post I will provide an overview of how we can build an ETL (Extract, Transform, Load) pipeline for Jira so that we can get better and easier access to the data.
Defining a target structure
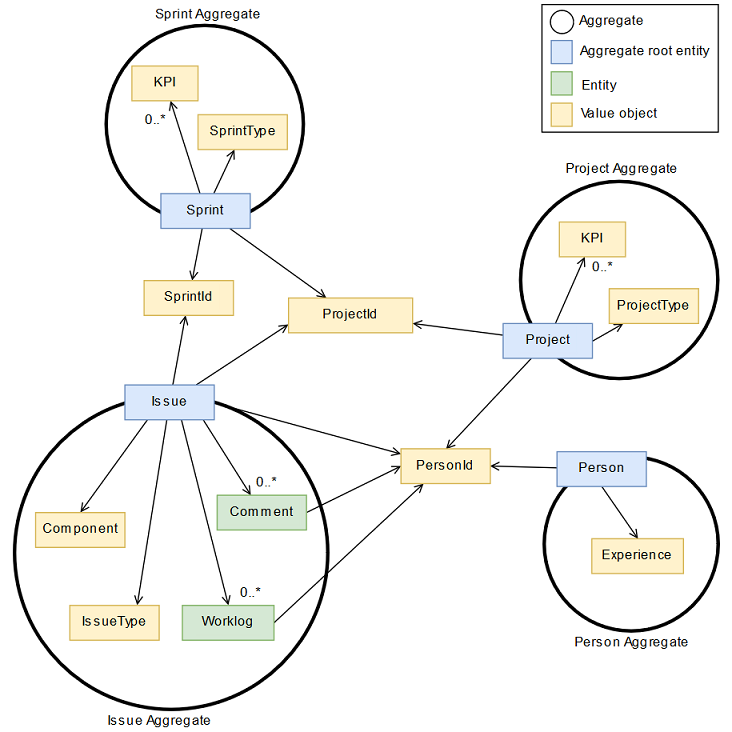
To be able to make better use of the data, we use a domain-driven design approach to define a clear domain model that serves as a basis for all further applications. The next steps will then be to extract all the data and transform it in this structure.

Extracting the data
There are various ways to extract data from Jira. It is discouraged to directly access the database since the model is subject to change and there is never a guarantee that queries will work the same way in a future version of the product. Plugins such as the Jira CLI provide functionality to extract almost any kind of Jira data in CSV format. They are not free of charge though and come with several usage restrictions and are therefore not suitable for our application either.
For these reasons, we will use various Jira REST APIs that abstract the access to the underlying data.
The technology of choice to extract the data will be a Kotlin-powered Spring Boot app, because Kotlin is a really cool JVM language that provides numerous convenience features - you should try it!
Step 1: Create JSON mapper classes
Jira REST endpoints return data in the JSON format. To avoid painful parsing and mapping of the JSON data, we use the Json to Kotlin class IDEA Plugin and generate a Kotlin class which the JSON response will be automatically mapped to. We can then already do a first manual cleaning by removing the properties we are sure we do not need, such as roles, archive information and the 16x16 and 32x32 avatar URLs. After that, the generated class for Jira projects looks like this:
data class JiraProject(
        val id: Int,
        val key: String,
        val name: String,
        val description: String,
        val lead: Lead?,
        val projectCategory: ProjectCategory?,
        val projectTypeKey: String,
        val self: String,
        val avatarUrls: AvatarUrls?
) {
    data class Lead(
            val active: Boolean,
            val displayName: String,
            val key: String,
            val name: String,
            val self: String
    )

    data class ProjectCategory(
            val description: String,
            val id: String,
            val name: String,
            val self: String
    )

    data class AvatarUrls(
            @JsonProperty("48x48") val avatarUrl: String
    )
}
Note that the @JsonProperty annotation can be left out if the properties name is equal to the JSON name.
The same procedure is applied for Issues, Comments, Worklogs and Sprints. For pageable content like issues, we additionally create a wrapper class that contains info about the request itself. We don't want this information in the JiraIssue class since it doesn't logically belong there.
data class JiraIssueWrapper(
        val expand: String?,
        val issues: List<JiraIssue>,
        val maxResults: Int,
        val startAt: Int,
        val total: Int
)
Step 2: Providing persistence in a stage database
To store the extracted data, we use a Mongo database in addition to some Spring Boot magic. All we need is to define an interface extending the Spring Data MongoRepository and Spring Boot will automatically generate an implementation for us:
interface JiraProjectRepository : MongoRepository<JiraProject, String>
Easy as that! Once again, we do the same thing for all other entities of interest.
Of course we need a running MongoDB for this to work. I use Docker for this:
docker run -d mongo:latest
Step 3: Writing an extraction service
We create a service and inject the previously created JiraProjectRepository as a dependency. We load properties defined
in a resource file, add some methods to fetch different types of data from the APIs and store it using the MongoRepositories
created in the previous step:
@Service
class JiraService(
        restTemplateBuilder: RestTemplateBuilder,
        private val jiraProjectRepository: JiraProjectRepository,
        private val jiraIssueRepository: JiraIssueRepository,
        private val jiraCommentRepository: JiraCommentRepository,
        private val jiraWorklogRepository: JiraWorklogRepository,
        private val jiraSprintRepository: JiraSprintRepository
) {

    @Value("\${jira.apiurl}")
    private lateinit var apiurl: String

    @Value("\${jira.username}")
    private lateinit var username: String

    @Value("\${jira.password}")
    private lateinit var password: String

    private val restTemplate: RestTemplate by lazy {
        restTemplateBuilder.basicAuthentication(username, password).build()
    }

    private val logger = Logger.getLogger(this.javaClass.name)

    fun extractAndSaveProjects() {
        val projects = extractProjects()
        jiraProjectRepository.saveAll(projects)
        logger.info("saved ${projects.size} projects")
    }

    fun extractAndSaveIssuesForProjects() {
        val projects = jiraProjectRepository.findAll()
        projects.forEach {
            val issues = extractIssuesForProject(it.id)
            jiraIssueRepository.saveAll(issues)
            logger.info("project ${it.name}: saved ${issues.size} issues")
        }
    }

    private fun extractProjects(): Array<JiraProject> {
        val projectsUrl = "$apiurl/project?expand=lead,description"
        val projects = restTemplate.getForObject<Array<JiraProject>>(projectsUrl)
        return projects ?: arrayOf()
    }

    private fun extractIssuesForProject(projectId: Int): List<JiraIssue> {
        val issuesUrl = "$apiurl/search?jql=project=\"$projectId\""
        val issues = mutableListOf<JiraIssue>()
        var startAt = 0
        val maxResults = 1000 // we cannot get more than 1000 per request, that's why we need to iterate
        do {
            val issueWrapper = restTemplate.getForObject<JiraIssueWrapper>("$issuesUrl&startAt=$startAt&maxResults=$maxResults")
            issueWrapper?.issues?.let { issues.addAll(it) }
            startAt += maxResults
        } while (startAt < issueWrapper?.total ?: 0)
        return issues
    }

    // methods for Comments, Sprints, Worklogs etc. left out for brevity.

}
And this is all we need for the extraction process. Since the REST API queries and throughput are limited, fetching ten years worth of data is a rather time-consuming operation and takes an hour or two to complete. However, we now have a data source that provides the same data as the Jira REST API but is much easier to query and faster by several orders of magnitude!
Transforming the data into the target structure
After implementing the previously defined domain model in Kotlin, we are now ready to transform the data into the domain model. We achieve this by defining transformer objects in Kotlin that define the necessary steps to map a stored Jira object to an entity in the domain model. These transformers can easily be nested, so that there is a clear separation of concerns and every transformer transforms exactly one thing. The next code listing shows a very simple transformer example.
object JiraIssueToResolutionTransformer : JiraTransformer<JiraIssue, Resolution> {

    override fun transform(source: JiraIssue): Resolution {
        val resolution = source.fields.resolution?.name?.toLowerCase()
        return when (resolution) {
            "fixed", "done" -> FIXED
            "won't fix", "won't do", "invalid", "cannot reproduce", "incomplete" -> WONT_FIX
            "duplicate" -> DUPLICATE
            else -> NONE
        }
    }

}
When all necessary transformers are implemented, we bundle them in a service that executes them in the proper order as illustrated in the following sequence diagram:

As can be derived from the the diagram of the example issue transformation, the transformed issues will be passed to the
IssueApplicationService, which resides in the core part of the application and serves as an interface to the domain model
that we defined. For now, calling addIssues() simply stores the issues in an abstract repository.
class IssueApplicationService(private val issueRepository: IssueRepository) {

    private val logger = Logger.getLogger(this.javaClass.name)

    fun addIssues(issues: List<Issue>) {
        issueRepository.saveAll(issues)
        logger.info("Saved ${issues.size} issues")
    }

}
Loading the transformed data to Elasticsearch
Now that the hard and time-consuming part is done, we can start experimenting with the fun stuff! There are three applications that are particularly interesting:
- Visualizing the data and providing a easy-to-use query platform (using Kibana and Elasticsearch)
- Calculating project related KPIs (Key Performance Indicators) for deeper insights in team and company performance
- Using these ten years worth of data for specific machine learning problems and eventually forecast KPIs
Point 2 and 3 deserve their own blog post and will be covered in the next one. We can very quickly realize the first one though, now that our transformed data is ready.
Analogous to the MongoRepository, Spring Data Elastic provides an ElasticRepository interface that will automatically be implemented
when we define an appropriate interface:
interface ElasticIssueRepository : ElasticsearchRepository<ElasticIssue, String>
Note the additional ElasticXXX classes to map the domain entities to corresponding Elasticsearch indexes.
This is done to avoid pollution of the domain model with Elasticsearch related annotations. Also it allows for an easy conversion
to types that are supported by Elasticsearch (for example to make sure dates are properly displayed).
Using Kotlin data classes, this is very straightforward to do:
@Document(indexName = "issue", type = "issue", refreshInterval = "30s")
class ElasticIssue(
        val id: String,
        val title: String,
        val isReporterByCustomer: Boolean,
        val sprint: ElasticSprint?,
        val worklogs: List<ElasticWorklog>,
        val technologies: List<String>,
        // ... more properties
) {

    constructor(issue: Issue, sprint: Sprint?) : this(
            id = issue.id.value,
            title = issue.title,
            isReporterByCustomer = issue.isReportedByCustomer(),
            sprint = if (sprint == null) null else ElasticSprint(sprint),
            worklogs = issue.worklogs.map { ElasticWorklog(it, issue) },
            technologies = issue.technologies,
            // ... more properties
    )

    class ElasticSprint(val name: String, val number: Int?, val type: String?, val endDate: String?) {

        constructor(sprint: Sprint) : this(
                sprint.name,
                sprint.number,
                sprint.type?.name,
                sprint.endDate?.format(DateTimeFormatter.ISO_DATE)
        )

    }

}
Almost done. We once again create a service to tape it all together:
@Service
class ElasticService(
        private val elasticIssueRepository: ElasticIssueRepository,
        private val issueApplicationService: IssueApplicationService) {

    private val logger = Logger.getLogger(this.javaClass.name)

    fun saveIssuesToElasticsearch() {
        logger.info("Saving issues and worklogs to Elasticsearch...")
        val issues = issueApplicationService.getAllIssues()

        val elasticIssues = issues.map { ElasticIssue(it.key, it.value) }
        elasticIssueRepository.saveAll(elasticIssues)
        logger.info("Saved ${elasticIssues.size} elasticIssues to Elasticsearch")
    }

}
Et voilà! One call to saveIssuesToElasticsearch() will store everything to Elasticsearch.
Obviously you need an Elasticsearch instance running on your host. I defined a docker-compose.yml file to run both
Elasticsearch and Kibana with the command docker-compose up -d:
version: '3.7'

services:
  elasticsearch:
    image: elasticsearch:6.5.0
    container_name: jira-etl-elasticsearch
    ulimits:
      nofile: 65536
    ports:
      - 9200:9200
      - 9300:9300
    environment:
      - cluster.name=elasticsearch
  kibana:
    image: kibana:6.5.0
    container_name: jira-etl-kibana
    ports:
      - 5601:5601
    depends_on:
      - elasticsearch
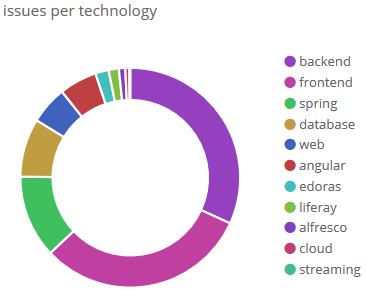
We can now go to localhost:9200 and visually and interactively explore our data! Let's see how the technologies of the
issues are distributed for example:

Conclusion
In this blog post we saw how an ETL pipeline for Jira can be built and used to transform data from a rather complex and heterogenous format to a clear structure that can now be used for many other applications.
In the next post we will investigate how project related KPIs can be calculated based on this dataset and how different machine learning algorithms can be applied to make forecasts for certain KPIs to give project managers a tool for more effective planning and controlling.