Building modern API in Liferay DXP with Swagger and JAX-RS
With the arrival of Liferay DXP and JAX-RS services, we discovered a whole new world beyond JSON-WS and Service Builder. In this article, we are going to convince you to take the plunge with this new technology, showing how its combination with Swagger and the OpenAPI specification can help us to quickly build robust REST API.
JAX-RS? Did I miss something?
JAX-RS is a JEE specification based on annotations such as: @Path, @GET or @POST; which simplify REST API development. This specification has several implementations including Apache CXF, which is what we will find in Liferay.
The appearance of JAX-RS in Liferay DXP is no accident. It is closely linked to the new JS frameworks which are flooding the modern Internet these days: such an accepted specification streamlines the development of the APIs that of late consume the applications developed on Angular, React or even MetalJS.
OK, and what is this thing called Swagger?
When we talk about Swagger we are referring to a framework used for designing, documenting and building REST APIs.
With Swagger Editor and the OpenAPI specification, we can design and describe the API we are about to build. With Swagger Codegen one can generate the code both as client and server in over 50 programming languages, and with SwaggerUI, we can test and see the documentation for the designed API.

You can form a clear picture of what this is all about: With Swagger, we can abstract the logic of the API implementation on simple file that holds an OpenAPI definition. This file is used to generate both the documentation and code to serve our REST API and will then provide the DTOs used in our Liferay backend.
The best way of seeing how to use Swagger in our JAX-RS modules is with an example, so let’s do an example :)
Defining an example API
To begin with, let’s define the API that will be used in our example. We will create an interface for a small note manager which will include the classic reading and writing operations.
This task will be performed via the Swagger Editor, where we can depict the API in YAML format while obtaining the preview of the documentation that will be generated afterwards.
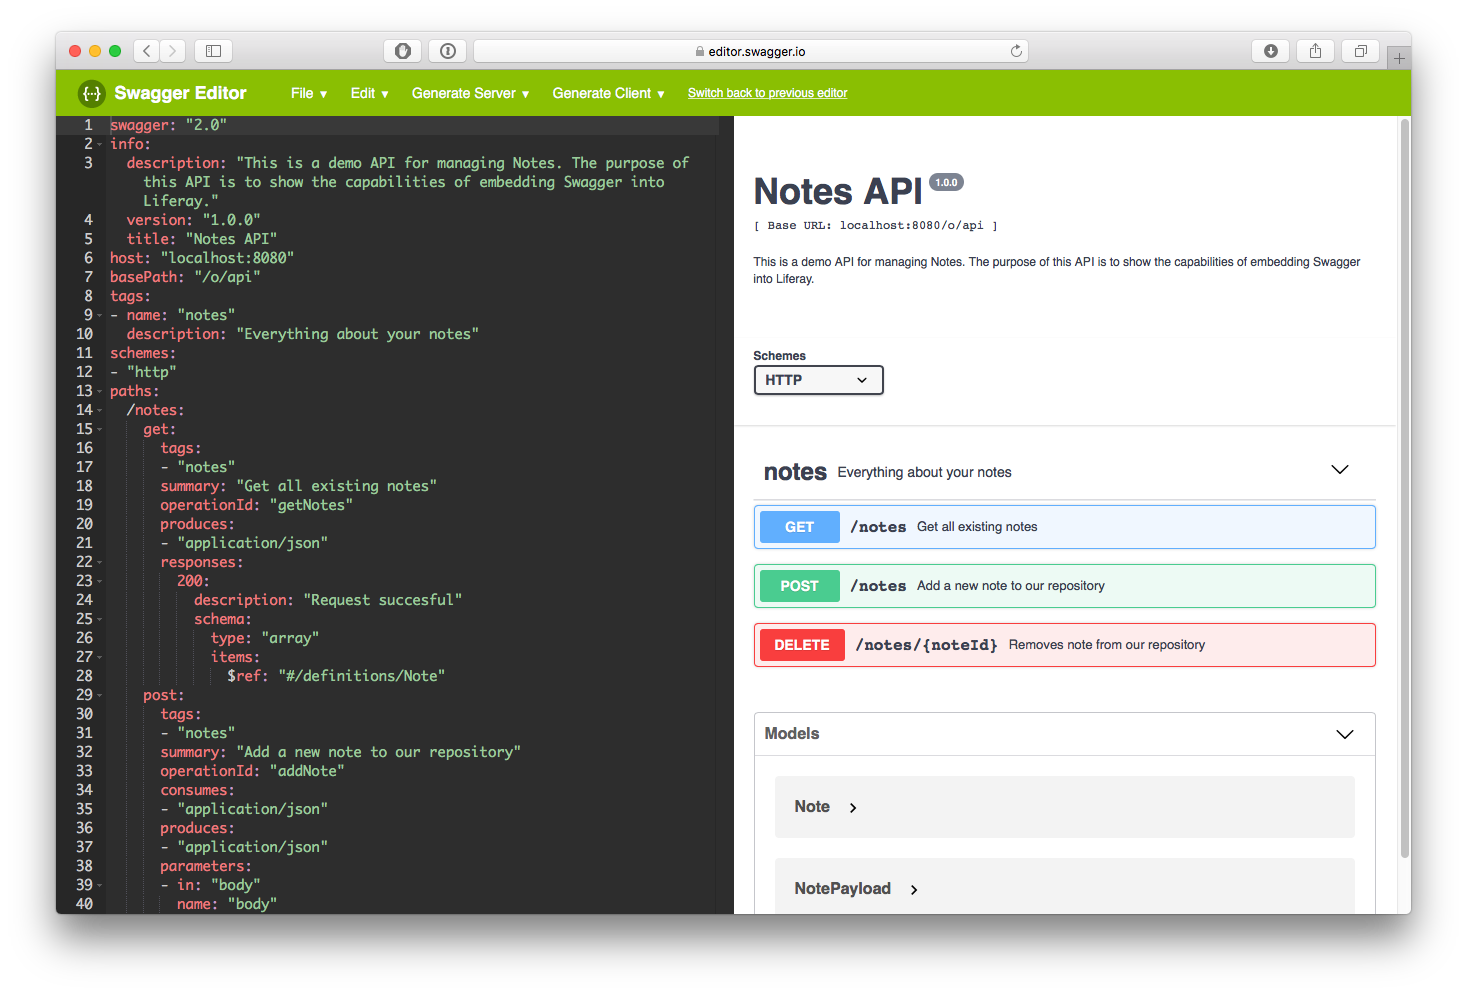
The definition of our API will include a single endpoint /notes which allows us to execute GET, POST, and DELETE requests. A Note model will also be available, including the id, content and date properties, as well as a NotePayload module, used in the creation operation and with a single content property.
As the aim of this article is not to expand on the OpenAPI specification, we are including the resulting YAML that you can import directly into Swagger Editor below:
swagger: "2.0"
info:
  description: "This is a demo API for managing Notes. The purpose of this API is to show the capabilities of embedding Swagger into Liferay."
  version: "1.0.0"
  title: "Notes API"
host: "localhost:8080"
basePath: "/o/api/v1"
tags:
- name: "notes"
  description: "Everything about your notes"
schemes:
- "http"
paths:
  /notes:
    get:
      tags:
      - "notes"
      summary: "Get all existing notes"
      operationId: "getNotes"
      produces:
      - "application/json"
      responses:
        200:
          description: "Request succesful"
          schema:
            type: "array"
            items:
              $ref: "#/definitions/Note"
    post:
      tags:
      - "notes"
      summary: "Add a new note to our repository"
      operationId: "addNote"
      consumes:
      - "application/json"
      produces:
      - "application/json"
      parameters:
      - in: "body"
        name: "body"
        description: "Note object that needs to be added to to our repository"
        required: true
        schema:
          $ref: "#/definitions/NotePayload"
      responses:
        200:
          description: "Request succesful"
          schema:
            $ref: "#/definitions/Note"
  /notes/{noteId}:
    delete:
      tags:
      - "notes"
      summary: "Removes note from our repository"
      operationId: "removeNote"
      parameters:
      - name: "noteId"
        in: "path"
        description: "ID of note to delete"
        required: true
        type: "integer"
        format: "int64"
      responses:
        200:
          description: "Request succesful"
        404:
          description: "Note not found"
definitions:
  Note:
    allOf:
      - $ref: "#/definitions/NotePayload"
      - type: object
        properties:
          id:
            type: "integer"
            format: "int64"
          date:
            type: "string"
            format: "date-time"
            description: "Date when the note was submitted"
  NotePayload:
    type: "object"
    properties:
      content:
        type: "string"
        description: "Note text"
Several alternatives to Swagger Editor can be found online, allowing both the design and documentation of API based on the OpenAPI specification, some of which are fairly comprehensive such as OpenAPI-GUI.
In order to obtain the JSON file used by Swagger Codegen to generate the API, we will use the Swagger Editor File menu and select the Convert and save as JSON option.
Creating the JAX-RS endpoint
Before start coding we need to create the OSGI module that will serve our API. This module will be a JAX-RS module which can be created in our Liferay workspace by executing the following command:
blade create -t rest -p com.sample.api -c Rest notes-api
Remember that thanks to blade, we have several templates that will help us to generate a base code for our projects.
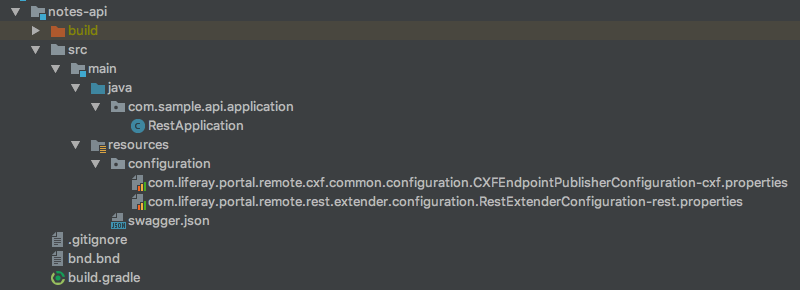
By taking a look at the modules folder in the Liferay workspace, we will see that we now have a new module called notes-api. We will add the JSON generated with Swagger Editor seen in the previous point into the resources folder, keeping the folder structure as follows:
Integrating Swagger Codegen in Liferay
To complete our endpoint functionality we need to integrate two pieces that have been working separately until now: Swagger and Liferay.
On the previous step we added the API specification to our module. Now we're going to setup now a new task in Gradle for triggering this automatic generation of DTOs and interfaces.
To do so, we will start by adding, to the build.gradle script, the new dependencies needed for both the operation of Swagger Codegen in Gradle as well as the code to be generated.
dependencies {
	compileOnly group: "javax.ws.rs", name: "javax.ws.rs-api", version: "2.0.1"
	compileOnly group: "org.osgi", name: "org.osgi.service.component.annotations", version: "1.3.0"
	compileOnly group: 'org.apache.cxf', name: 'cxf-bundle-jaxrs', version: "2.2.9"
	compileOnly group: 'io.swagger', name: 'swagger-jaxrs', version: "1.5.17"

	compileInclude group: 'io.swagger', name: 'swagger-annotations', version: "1.5.17"
	compileInclude group: 'com.fasterxml.jackson.jaxrs', name: 'jackson-jaxrs-json-provider', version: "2.7.4"
}

import io.swagger.codegen.DefaultGenerator
import io.swagger.codegen.config.CodegenConfigurator

// Add swagger codegen to our buildscript dependencies
buildscript {
	repositories {
		mavenCentral()
	}
	dependencies {
		classpath("io.swagger:swagger-codegen:2.2.2")
	}
}
Next, we will define a new task within the same script called generateApi. This task will enable us to generate the interfaces and the models of our API directly from our build system.
// Define task for generating the API models and interfaces
task generateApi {
	doLast {
		def config = new CodegenConfigurator()
		config.setInputSpec("file:///${projectDir}/src/main/resources/swagger.json")
		config.setOutputDir("${projectDir}")
		config.setLang('jaxrs-cxf')
		config.setAdditionalProperties([
				'interfaceOnly': 'true',
				'apiPackage'   : 'com.sample.api',
				'modelPackage' : 'com.sample.api.model',
				'sourceFolder' : 'src/main/java',
				'skipOverwrite': true
		])
		new DefaultGenerator().opts(config.toClientOptInput()).generate()
	}
}
By modifying the
CodegenConfiguratorobject we're able to define certain aspects of the generated code, such as: the location of the file containing the OpenAPI specification, the directory in which the generated sources will be written, or even the allocated packages of these generated classes.
Last but not least, prior to generating our API, we must create a file called .swagger-codegen-ignore in the project parent directory. This file will prevent maven files and other artefacts that fall outside the scope of this article from being generated. Its content will be as follows:
# Swagger Codegen Ignore
# Use this file to prevent files from being overwritten by the generator.
# The patterns follow closely to .gitignore or .dockerignore.

**/impl/*
**/test/**
pom.xml
README.md
After executing the generateApi task, the file structure of our module should match the following image:
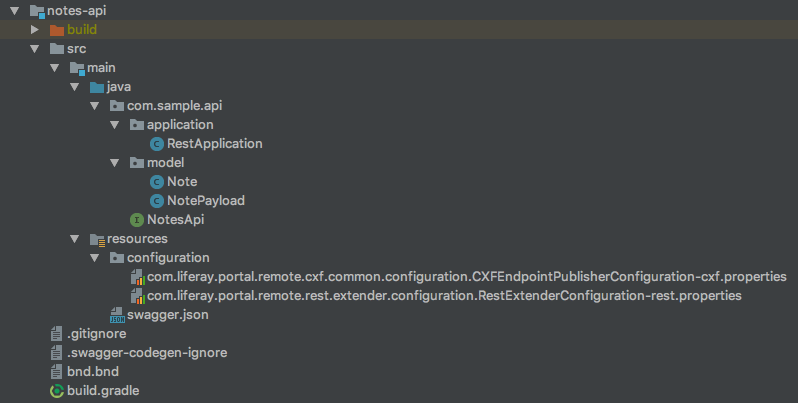
The two Note and NotePayload modules are simple POJO classes, with Swagger annotations. The NotesApi interface represents the endpoint we have defined to create/edit and delete Notes. If you have ever worked with Spring MVC RestControllers, you may be quite familiar with the structure given that the concept is fairly similar.
Implementing the API with JAX-RS
With the interfaces and the models generated based on our specification, the final step involves implementing our API.
We will begin with the implementation of the generated NotesApi class by creating the NotesApiImpl class within the com.sample.api.impl package. By means of example, its implementation will be as follows:
package com.sample.api.impl;

import com.sample.api.NotesApi;
import com.sample.api.model.Note;
import com.sample.api.model.NotePayload;

import javax.ws.rs.WebApplicationException;
import javax.ws.rs.core.Response;
import javax.xml.datatype.DatatypeConfigurationException;
import javax.xml.datatype.DatatypeFactory;
import java.util.*;

public class NotesApiImpl implements NotesApi {

    private long idCounter = 0;
    private List<Note> notes = new ArrayList<>();

    @Override
    public Note addNote(NotePayload body) {
        // Create note object from payload
        Note note = new Note();
        note.setId(idCounter++);

        try {
            GregorianCalendar gregorianCalendar = new GregorianCalendar();
            gregorianCalendar.setTime(new Date());
            note.setDate(DatatypeFactory.newInstance().newXMLGregorianCalendar(gregorianCalendar));
        } catch (DatatypeConfigurationException e) {
            // Unexpected error. Answering our request with Internal Server Error (500)
            throw new WebApplicationException();
        }
        note.setContent(body.getContent());

        // Add note to our internal list
        notes.add(note);

        return note;
    }

    @Override
    public List<Note> getNotes() {

        return notes;
    }

    @Override
    public void removeNote(Long noteId) {
        Optional<Note> noteToDelete = notes.stream().filter(note -> note.getId().equals(noteId)).findFirst();

        if (!noteToDelete.isPresent())
        {
            // If note doesn't exist answer the request with Not Found (404)
            throw new WebApplicationException(Response.Status.NOT_FOUND);
        }

        // Otherwise remove note
        notes.remove(noteToDelete.get());
    }
}
All we need to do is to modify the RestApplication class generated by Liferay so it uses the endpoint we have just writen. To do so, we must delete the default API implementation included in Liferay and return on the getSingletons method our implementation of NotesApi along with a default serialiser for the responses our API provides.
The class would be as it follows:
package com.sample.api.application;

import com.fasterxml.jackson.jaxrs.json.JacksonJsonProvider;
import com.sample.api.impl.NotesApiImpl;
import org.osgi.service.component.annotations.Component;

import javax.ws.rs.*;
import javax.ws.rs.core.Application;
import java.util.HashSet;
import java.util.Set;

@ApplicationPath("/v1")
@Component(immediate = true, service = Application.class)
public class RestApplication extends Application {

	public Set<Object> getSingletons() {
		Set<Object> singletons = new HashSet<>();

		// Register Jackson JSON serializer and our notes endpoint
		singletons.add(new JacksonJsonProvider());
		singletons.add(new NotesApiImpl());

		return singletons;
	}

}
Deploying and testing the solution
If you have made it this far, you should be eager to test the API we have generated. The first thing we need to do is to deploy the module and check that it has launched correctly.
For this matter, we'll use the Gradle deploy task in our own module with blade gw deploy. If everything went seamlessly, after starting up our liferay bundle we should be able to see the following log trace:
00:00:00,000 INFO [fileinstall-/bundles/osgi/modules][BundleStartStopLogger:35] STARTED com.sample.api_1.0.0 [522]
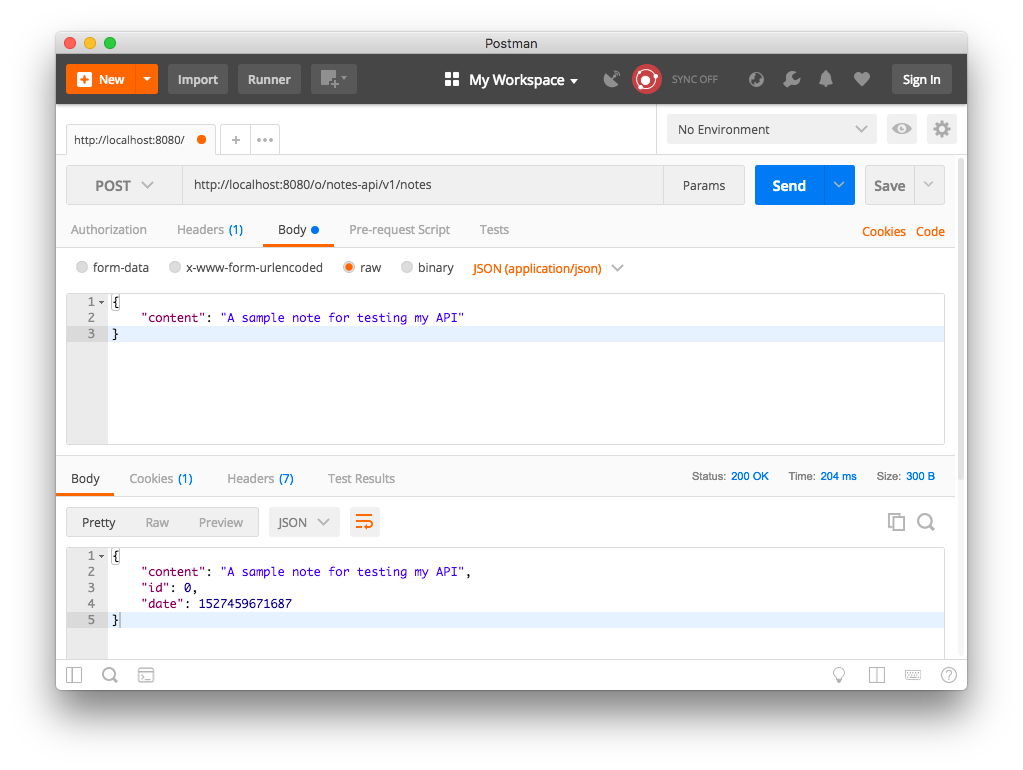
The remaining step is to test the API. With the default configuration, our API is now deployed as http://localhost:8080/o/notes-api/v1/, meaning that we only need to select our specification, open postman and start playing with the endpoint we have created ;)