How to use Canvas on Kibana
As everybody know, Elastic releases new versions of its products fairly regularly, so some of as are are always waiting for a new version to analyse and test new features.
In some cases, changes are minor or, at least, not very attractive. There have also been improvements that were eagerly anticipated for some time or that unexpectedly brought new value to the whole stack. For example, those improvements made on Kibana are usually one of the most awaited because, let's face it, it is a tool that has traditionally had much room for improvement.
So, the arrival of versions 6.5 and 7.x, which have added lots of new features on Kibana, have been really welcomed.
Let's take a look at one of these improvements: Canvas.
Canvas brings life and colour to our data, skipping the barriers of the traditional dashboards and presenting those data stored in Elasticsearch spectacularly. This is a fantastic tool for presenting the data and to build custom information panels.
Following a few steps, here is a practical example of how to use Canvas to create a customised data presentation.
Goal
The purpose of this example is to create a presentation with information of a log file from a fictitious application. This log file contains performance traces, user access information and java errors.
In order to build this presentation, we will focus only on the Login traces, with the ultimate goal of showing information about what users access this application the most, as well as measuring the number of successful or unsuccessful login attempts as a sample of the application's health.
Take a look at the traces format in the following example:
INFO 2019-01-15 17:05:45 [main] a.b.t.loggenerator.LogGenerator - LOGIN|400|Pantuflo|88.148.79.157
INFO 2019-01-15 17:05:45 [main] a.b.t.loggenerator.LogGenerator - PERFORMANCE|4.17|DOWNLOAD DOCUMENT|FAILURE|Sacarino
ERROR 2019-01-15 17:05:45 [main] a.b.t.loggenerator.LogGenerator - Error connecting to database|
java.lang.Exception: Error connecting to database
    at am.ballesteros.training.loggenerator.LogGeneratorKt.generateExceptionTrace(LogGenerator.kt:66)
    at am.ballesteros.training.loggenerator.LogGeneratorKt.generateTraces(LogGenerator.kt:31)
    at am.ballesteros.training.loggenerator.LogGeneratorKt$main$1.invoke(LogGenerator.kt:17)
    at am.ballesteros.training.loggenerator.LogGeneratorKt$main$1.invoke(LogGenerator.kt)
    at com.xenomachina.argparser.SystemExitExceptionKt.mainBody(SystemExitException.kt:74)
    at com.xenomachina.argparser.SystemExitExceptionKt.mainBody$default(SystemExitException.kt:72)
    at am.ballesteros.training.loggenerator.LogGeneratorKt.main(LogGenerator.kt:14)
INFO 2019-01-15 17:05:45 [main] a.b.t.loggenerator.LogGenerator - PERFORMANCE|4.204|DOWNLOAD DOCUMENT|FAILURE|Robin
INFO 2019-01-15 17:05:45 [main] a.b.t.loggenerator.LogGenerator - PERFORMANCE|5.844|EXPORT DATA|FAILURE|Pantuflo
INFO 2019-01-15 17:05:45 [main] a.b.t.loggenerator.LogGenerator - LOGIN|400|Thor|196.197.86.15
INFO 2019-01-15 17:05:45 [main] a.b.t.loggenerator.LogGenerator - PERFORMANCE|2.304|DELETE USER|SUCCESS|Superman
INFO 2019-01-15 17:05:45 [main] a.b.t.loggenerator.LogGenerator - PERFORMANCE|6.885|SEND EMAIL|SUCCESS|IronFish
As an additional note, these logs have been processed using Logstash to enrich some of the information shown. Although there is no need to know about all these improvements in order to follow this example, you should know that the Login traces have been enriched to geolocate users based on their IP, and to add a textual translation of the response code received.
Test environment
This example has been generated using the following test environment:
- macOS Mojave
- Java 1.8.0
- Logstash 6.5.4
- Elasticsearch 6.5.4
- Kibana 6.5.4
Resources
To create the final Canvas, images will be found at the following URL: https://bitbucket.org/ballesterosam/elastic-canvas/src/master/imgs/
Based on those images and thanks to the power of Canvas, this is the final result:
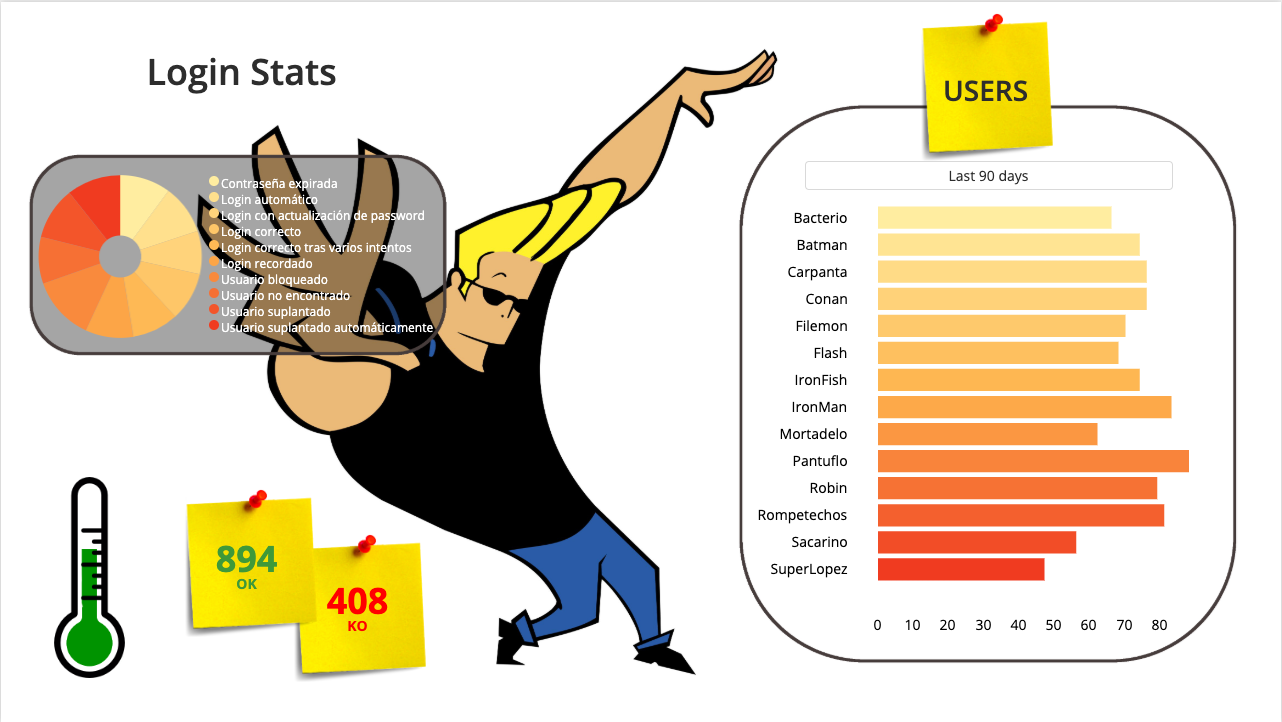 .
.
Step-by-step
Now that our images and resources are ready, let’s start designing our Canvas.
-
First, from Kibana, go to the Canvas menu and select Create new Workpad option.
-
Click on the empty canvas to configure it, indicating a name for the Canvas and the measurements to be used. In this case, we will call it Login Panel, and we will select a size of 720p to match the aspect ratio of the image that we will use as the background.
-
Now that we are facing the fearsome blank canvas, it's time to import all the graphic resources using the Add Element button. Select Image and, in the right column, select the option to paste the URL of the image to add our images. Repeat this step for each of the images to be used. Post-it can be included as many times as needed.
- https://bitbucket.org/ballesterosam/elastic-canvas/raw/5e069c952ae5f97e712e464ef5de034e8d63f672/imgs/johnny-bravo.jpg
- https://bitbucket.org/ballesterosam/elastic-canvas/raw/5e069c952ae5f97e712e464ef5de034e8d63f672/imgs/postit.png
- https://bitbucket.org/ballesterosam/elastic-canvas/raw/5e069c952ae5f97e712e464ef5de034e8d63f672/imgs/termometro-contorno.png
-
Arrange and adjust the sizes of all the images on the canvas according to the final design.
-
Now it is time to start defining views and make use of the data stored in Elasticsearch. Leveraging more advantages offered by Elasticsearch, we will use Elasticsearch SQL to extract and filter our data. The visualisations and elements that will be added to the Canvas are:
- A Markdown element to fill the title of the Canvas. In this example, the following code has been used to define it (the code is placed in the right column, in the Display section):
# **Login Stats**- Another additional Markdown element to place on the post-it at the top of the user section:
## **USERS**-
We will also add a Time Filter as a date selector, which enables selection of the time ranges from which the data will be return. These selector types are mandatory for all Canvas that are based on time-based data (histograms, time series, etc.).
-
Now add a graphic view of Vertical Lines to obtain a list of the users who interact with this application. In the right column, under the Datatab, select the option to change the data source and select Elasticsearch SQL as a new data source. With the index format that has been defined, this statement will return the appropriate data:
SELECT user FROM "log-generator*" WHERE type='LOGIN' ORDER BY user-
On the same right column, in the Display tab, define the graphic's behaviour and its design. Now choose between the different colour palettes to adapt the view to the design and then define the behaviour of the graphic. In this case, the following values are used:
- X-axis: a Count over the user field.
- Y-axis: the Value of the user field.
- Color: once again, the Value of the user field.
-
For the next view, add a Donut element. The Elasticsearch SQL statement that will extract the required data is:
SELECT responseCode, responseText FROM "log-generator-*" WHERE type='LOGIN'-
As in the previous case, this display can be completely configured in the Display tab, Including colour palette, size of the Donut hole, placement of the legend, etc. We will also add a specific behaviour of the graphic that will display the extracted data. In this case, configure as follows:
- Slice labels: select the Value of the responseText field.
- Slice angles: select a Count over the responseCode field.
-
Next add the two elements that show the absolute values of correct and failed Logins. To do this, use two Metric elements with the following Elasticsearch SQL statements. In the Label field for each one, add the values OK and KO respectively:
SELECT responseCode FROM "log-generator-*" WHERE type='LOGIN' and responseCode<300SELECT responseCode FROM "log-generator-*" WHERE type='LOGIN' and responseCode>300-
Finally, add the element that will act as the temperature indicator on the thermometer. The use of this element requires some expertise, since it involves superimposing the image of the contour of the thermometer with the image of its filling, in order to, visually, create an unique image. To incorporate the fill, use a new Image Reveal element and add the following URL for the image in the right column: https://bitbucket.org/ballesterosam/elastic-canvas/raw/5e069c952ae5f97e712e464ef5de034e8d63f672/imgs/termometro-relleno.png.
-
In order to configure the behaviour of this view, none of the options that appear in the right column can be used, since the calculations to be made are not supported by any of those possibilities. Functionally, a correlation has to be made between the number of successful Logins and failed Logins (the visible part of the image will depend on this value). To define this function, use the expression editor on the lower right part of the screen. The complete expression is:
filters | essql query="SELECT responseText, responseCode FROM \"log-generator-*\" WHERE type='LOGIN'" | mapColumn "responseCode" exp={getCell "responseCode" | if {lt 300} then=1 else=0} | math "sum(responseCode) / count(responseCode)" | revealImage origin="bottom" image="https://bitbucket.org/ballesterosam/elastic-canvas/raw/5e069c952ae5f97e712e464ef5de034e8d63f672/imgs/termometro-relleno.png" | render- Firstly, this expression includes the query to be used (which could also be added the same way as in the previous views) and, secondly, the calculations to be made to define this percentage.
With all these elements, everything necessary to configure this Canvas is already prepared. Now, we can add more pages in order to finish a complete presentation but, in this case, out work is finished at this point.
To summarise, possibilities provided by Canvas to present the data stored on Elasticsearch, makes this tool a great alternative for making presentations (compared with dashboards and more traditional views). There are many more types of elements that can be added to these Canvas that are not used in this example, although the mechanism to use each of them is similar to those described in this entry.
The following URL contains all the resources required to make this example: https://bitbucket.org/ballesterosam/elastic-canvas/src/master/. This repository contains a copy of the final Canvas, as well as examples of log traces, logstash and filebeat configurations and a small application developed in Kotlin to generate more sample traces.
This is not the only new feature that has been added to the latest versions of Kibana; others will be analysed in future posts.