Dev Environments in the Cloud: An Experiment with Gitpod
Some people are arguing that the local dev environment is soon going to be a thing of the past. The main idea behind such claims is that the cloud is so powerful and gives you so much advantage in terms of reproducibility that overpowered developer machines are not necessary anymore (or even a drawback).
With this post, I don't want to join the discussions or speculations about the future of localhost but instead take a test drive with one popular option for Cloud Development Environments: Gitpod.
Background and Expectations
Most of my coding work as a Cloud Automation Engineer (CAE) happens with the following stack:
- a MacBook Pro as the underlying hardware
- Warp as a terminal
- NeoVim with some plugins as IDE
- The Unix Shell and Makefiles
- A lot of configurations stored in a dotfiles repository
As a CAE, I know the pain of setting up a local development environment when joining a new project and downloading a repository for the first time. I have even worked hard in multiple teams to reduce the "time to first working code change" for different backend and frontend applications.
With this background, I wanted to see how quickly and easily I could set up a working dev environment in Gitpod for a sample project of mine. This project consists of a simple Rust web server. It also has some Node.js dependencies for semantic releases.
Apart from testing the speed for setting up a generic dev environment, I was also interested in seeing how fast I could adapt this setup for my special needs, especially with NeoVim and my dotfiles.
First Excitement
As the documentation points out, setting up a Gitpod Workspace is as easy as opening the URL gitpod.io/#{url-of-your-repository}.
In fact, you can start a Gitpod Workspace just like I did by opening this URL:
https://gitpod.io/#https://github.com/jscheytt/pi-broadcast
This is what impressed me the most right away:
- After less than a minute, I had a working VS Code inside the browser.
- If you have ever started a Codespace from within GitHub by pressing
., this is nothing new for you.
- If you have ever started a Codespace from within GitHub by pressing
- Gitpod automatically recognized that this was both a Rust and a Node.js project:
- It created a
.gitpod.ymlright away and instructed it to install all the dependencies and run the Rust build in watch mode (which I didn't even know existed before!).
- It created a
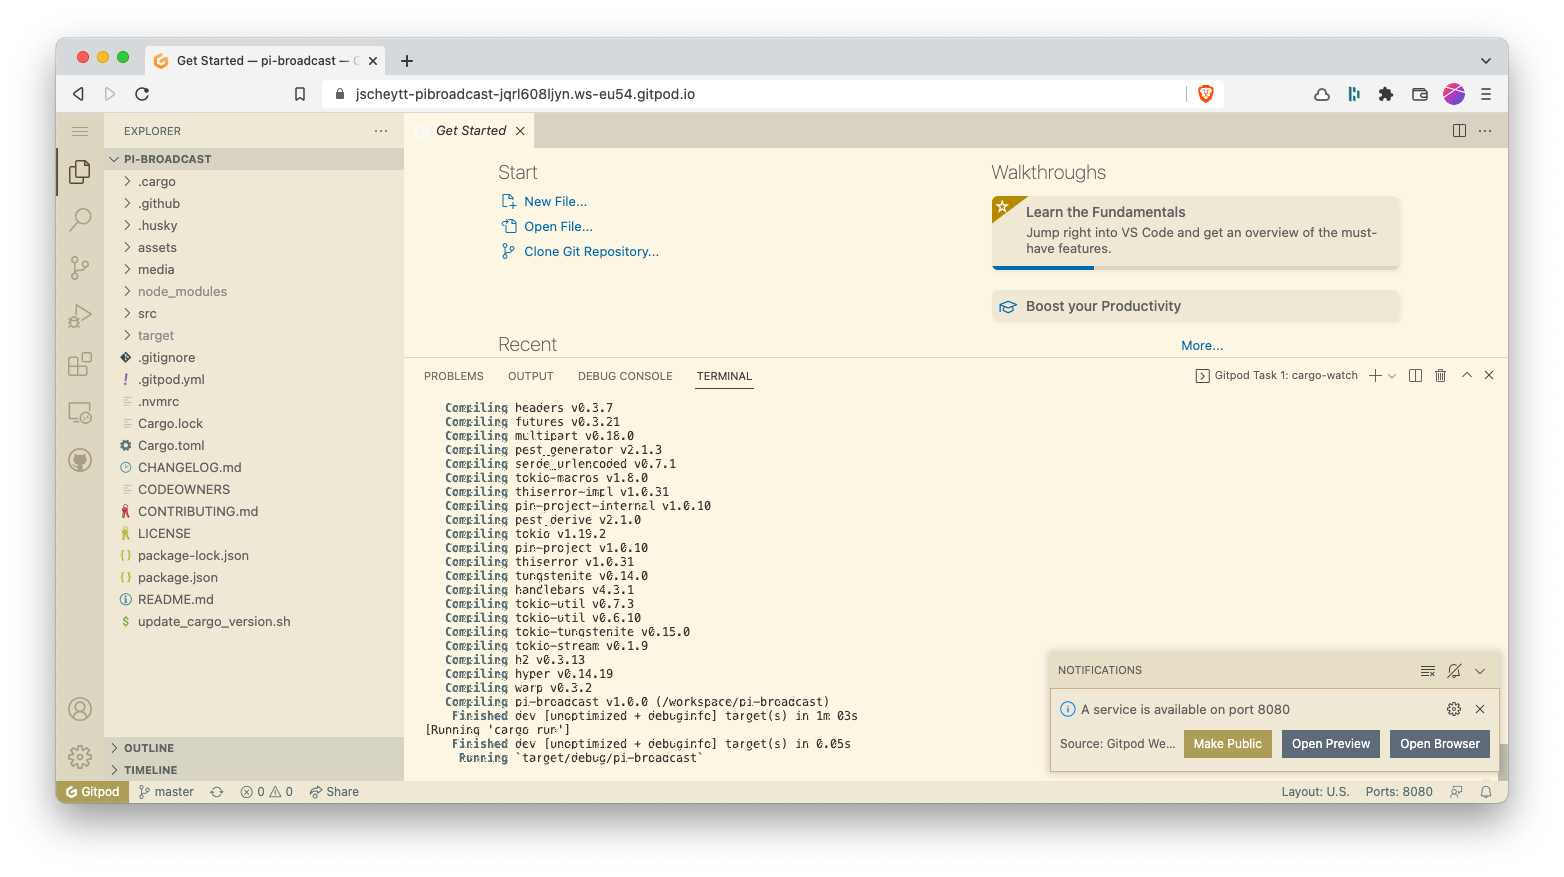
- Gitpod automatically detected that my application was running something on port 8080 and immediately offered to do something with it:
- Gitpod offers to either open a preview inside your browser VS Code, open a preview in a new browser tab or even expose the port publically.
- While this last option may be a security nightmare for some, I think it's a very cheap way of implementing preview environments!
- The default dev environment comes packed with goodies, e.g.
pyenv,homebrew, anddockerpreinstalled. (To check out everything it has to offer, take a look at the gitpod/workspace-full Docker image.) - Not only did I get a VS Code in the browser, but I also had the option to log into that same cloud dev environment via SSH.
- (At the time when I tried this out, only completely public access (without password or private key restrictions) was possible. In the meantime, public key upload has been implemented.)
- As NeoVim is my IDE of choice, this is essential for getting a working personal dev environment.
- When closing the browser tab, it did tear down my environment:
- When I went back to the Gitpod Workspaces overview and selected "Open", the Workspace was completely fresh again without any of my previous changes ✅.
- But changing my VS Code theme was directly persisted:
- When I restarted the Workspace or created a new one in a different repo, the theme was kept - without me installing or setting up any extra VS Code plugins! Very comfortable 👍
- SSHing into my Gitpod Workspace was straightforward and felt very native as if I were navigating on my local machine (kudos to Warp!).
Limitations
I wanted to directly commit the automatically created .gitpod.yml but this proved difficult because the Gitpod app did not have enough permissions on my GitHub repository.
Thankfully, that was straightforward enough - I think I solved it in under 10 minutes.
Including my dotfiles proved a bit more difficult though:
- My goal was to install NeoVim with plugins and zsh and all its configs (e.g. aliases).
- When connecting to the Workspace via SSH, bash was the default Shell (Warp seems to do this automatically).
- I tried zsh, but that broke the visually nice integration with Warp - so I decided to postpone my zsh goals and just focus on getting NeoVim running.
- Connecting my dotfiles repository was a simple setting in the Gitpod Preferences.
- One thing that tripped me up was that the dotfiles setup has a hard limit of 2 minutes.
- This, of course, makes sense if you want to build a product where the creation of Workspaces should happen very fast.
- At first I was irritated, but I think setting a low threshold like this is very healthy because it makes you consider the performance of your setup procedures.
- To stay within this deadline, I created a custom script and custom Ansible playbook.
- This install script is very customized to Gitpod currently, but it does the job:
- It ignores the python version committed to the repo so I can save time by using the already installed Python 3 version.
- It only installs Ansible via pip, NeoVim via Homebrew, and the NeoVim plugins via NeoVim headless mode.
- Debugging the setup script was not so straightforward:
- You have to check
~/.dotfiles.log, this will contain a log of the install script. - I ultimately postponed trying to install the NeoVim plugins in headless mode. So now I simply open up NeoVim once after starting the SSH session, wait 5-10 seconds for everything to install, close, and open it again, and everything is ready 😊.
- You have to check
- One thing that bugged me on SSH was that the starting directory was not set to
/workspace/{repo-name}(where the code lives inside your workspace).- I found out that Gitpod is doing everything correctly and it's just a bug with Warp.
- For my desired flow, I simply had to alias
sshto/usr/bin/sshand add the following entry to my ssh config file:Host *.gitpod.io RemoteCommand bash RequestTTY yes
Final Custom Workflow
My final custom workflow for working with NeoVim in a GitPod Workspace now looks like this:
- Create a feature branch in the repo.
- Start a Workspace in Gitpod.
- Wait around 3 minutes (= Workspace image pull + dotfiles install script)
- Copy the ssh login command and execute it.
- Open NeoVim once to install all plugins.
- Open NeoVim again.
- 🚀 Start coding!
Future Improvements
- Getting rid of step 5 is just a matter of investing time (which I did not invest for this short experiment, but may do in the future).
- Installing my zsh plugins and especially aliases is also something I left out but will probably do in the future.
My Verdict and Recommendations
- Gitpod is very fast for setting up an average development environment.
- Working via SSH is possible although you should be prepared for tweaking your dotfiles for a stripped-down setup.
- In contrast to GitHub Codespaces and GitLab Web IDE, it is platform-independent and is compatible with all major Git providers (each both in their SaaS and on-prem variants).
- The auto-detection features are impressive and do a lot of heavy lifting automatically.
- I plan to start a Workspace in each of my public repos at least once and commit the automatically created
.gitpod.ymlfile — and I encourage everyone else to do that, too.
- I plan to start a Workspace in each of my public repos at least once and commit the automatically created
- I think Gitpod makes the most sense for Open Source projects to reduce onboarding time/friction and to increase reproducibility.
- But as you can even self-host Gitpod on a Kubernetes cluster of yours, in the future it may be a viable option even for on-prem companies to reduce their hardware costs by giving their devs just an average laptop with a fast browser.