Creating a Chrome extension
In this post, I will show you how to create a simple Chrome extension. I will also summarize what a Chrome extension can do, and I will introduce how to create more complex extensions based on modern JavaScript frameworks like React, Angular or Vue.
What is a Chrome extension? Google Chrome extensions are like small applications living in your browser, based on standard web technologies, such as HTML, CSS and JavaScript. They take advantage of some Chrome APIs, providing the foundations for building an app, like storage and messaging. Google Chrome extensions can interact with the web pages open in your browser tabs, but they are not really meant to. They can live on their own and provide any kind of functionality, separate from the browsing experience. You can build anything, from an agenda, to a pomodoro timer, to a web image scrapper. You can think of Chrome as the Electron platform, providing a basis for building JavaScript applications that can interact with the browsing experience.
Chrome extensions can stay dormant until some trigger awakes them, making some content or script to be injected, executed, or some popup shown. These scripts live in something called “Isolated Worlds” in relation with the web pages being browsed, which means that a Chrome extension can only share the DOM with a particular page, but not the script variables or functions. Chrome extensions can thus modify the DOM, inject additional CSS or JavaScript scripts which interact with the same DOM, but can not directly modify the original page CSS or JavaScript. On the other hand, the extensions can communicate with the page through messages, so you can create a page that gracefully interact with a Chrome extension.
Extension capabilities
This is an incomplete summary of what an extension can do:
- Show an icon. The extension icon can be modified on runtime, or show a badge over it, with a colored background and a 4 letter text in it.
- Show a popup. Clicking on the extension icon can trigger a popup with content.
- Show a secondary menu. Right clicking on the extension icon can trigger a secondary menu.
- Respond to shortcuts. Keyboard shortcuts can be associated to extension actions (i.e. CTRL+SHIFT+V).
- Respond to actions in the URL bar (the so called omnibox). Text shortcuts can be used in the omnibox to trigger actions in the extension (i.e. “myext+
"). - Respond to visiting some web page. For instance, modifying the icon state or popup content. Modify the content of a web site. For instance, modifying the DOM by a content script or applying additional CSS files.
- Have an Options page for the extension configuration.
- Replace the History page, Bookmarks page or New Tab page of Google Chrome.
- Exchanging messages with a web site or with itself. A extension can use messaging to talk to some web page being browsed, or to communicate between parts of the extension itself.
- Store information in local storage, Chrome storage (storage which is synchronized across different devices where the user is logged in) or any storage native to JS, for instance sessionStorage.
- Show notifications as a toast.
- Use several APIs provided by Google Chrome.
- Be free or paid. When creating a paid extension, you can choose to use the Chrome store or your own payment means.
The basics
The only mandatory file of a Chrome extension is the manifest. It has to be placed in the root directory, and it communicates the extension metadata, permissions and other files involved.
The manifest format has a lot of options, which can be ckecked in this page (https://developer.chrome.com/extensions/manifest), but we will focus on the most important ones. Let’s introduce the Cat detector extension manifest:
{
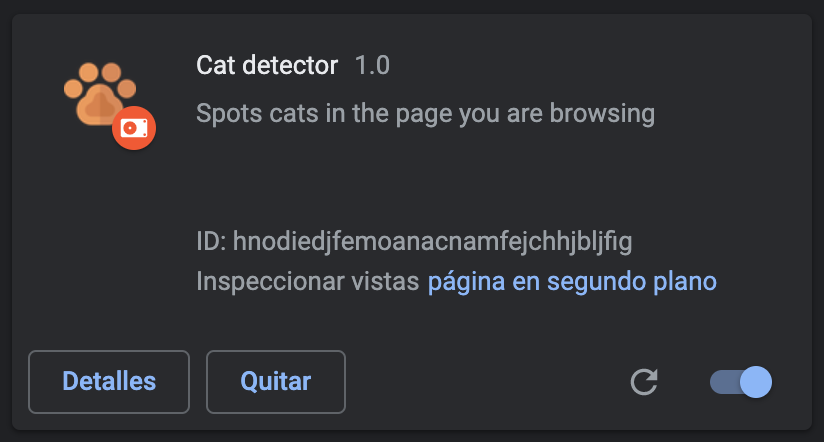
"name": "Cat detector",
"description": "Spots cats in the page you are browsing",
"manifest_version": 2,
"version": "1.0",
"background": {
"persistent": false,
"scripts": ["background.js"]
},
"content_scripts": [
{
"matches": ["<all_urls>"],
"js": ["content.js"]
}
],
"browser_action": {
"default_popup": "popup.html"
},
"icons": {
"16": "images/footprint-16.png",
"32": "images/footprint-32.png",
"48": "images/footprint-48.png",
"128": "images/footprint-128.png"
},
"permissions": ["activeTab"]
}
The manifest declares some capabilities that will be used by the extension:
- It declares a background script. Background scripts can activate at any time, but don't have direct access to the tabs content.
- It declares a content script. Content scripts get injected in the same page that is being browsed and have access to the content. A matches expression is used to determine when the script is injected. In this case we chose
<all urls>, meaning it will be injected in any web page. - It declares a browser action, meaning a extension that is able to work independently of the current browsed page. If we wanted to create a extension that only activates when some conditions are met in the page you are browsing, we would use a "page action”. The reason we chose browser action is that cats can be seen almost everywhere on the internet. A second reason is that we want to display a badge over the extension icon, and that is only possible using a browser action.
- Inside the browser action, it declares a popup that will be open on clicking on the extension icon.
- It declares icons. The smaller ones used for the browser icon, depending on the display resolution, and the bigger ones used in the extensions menu of Chrome and the Chrome Store.
Our sample extension
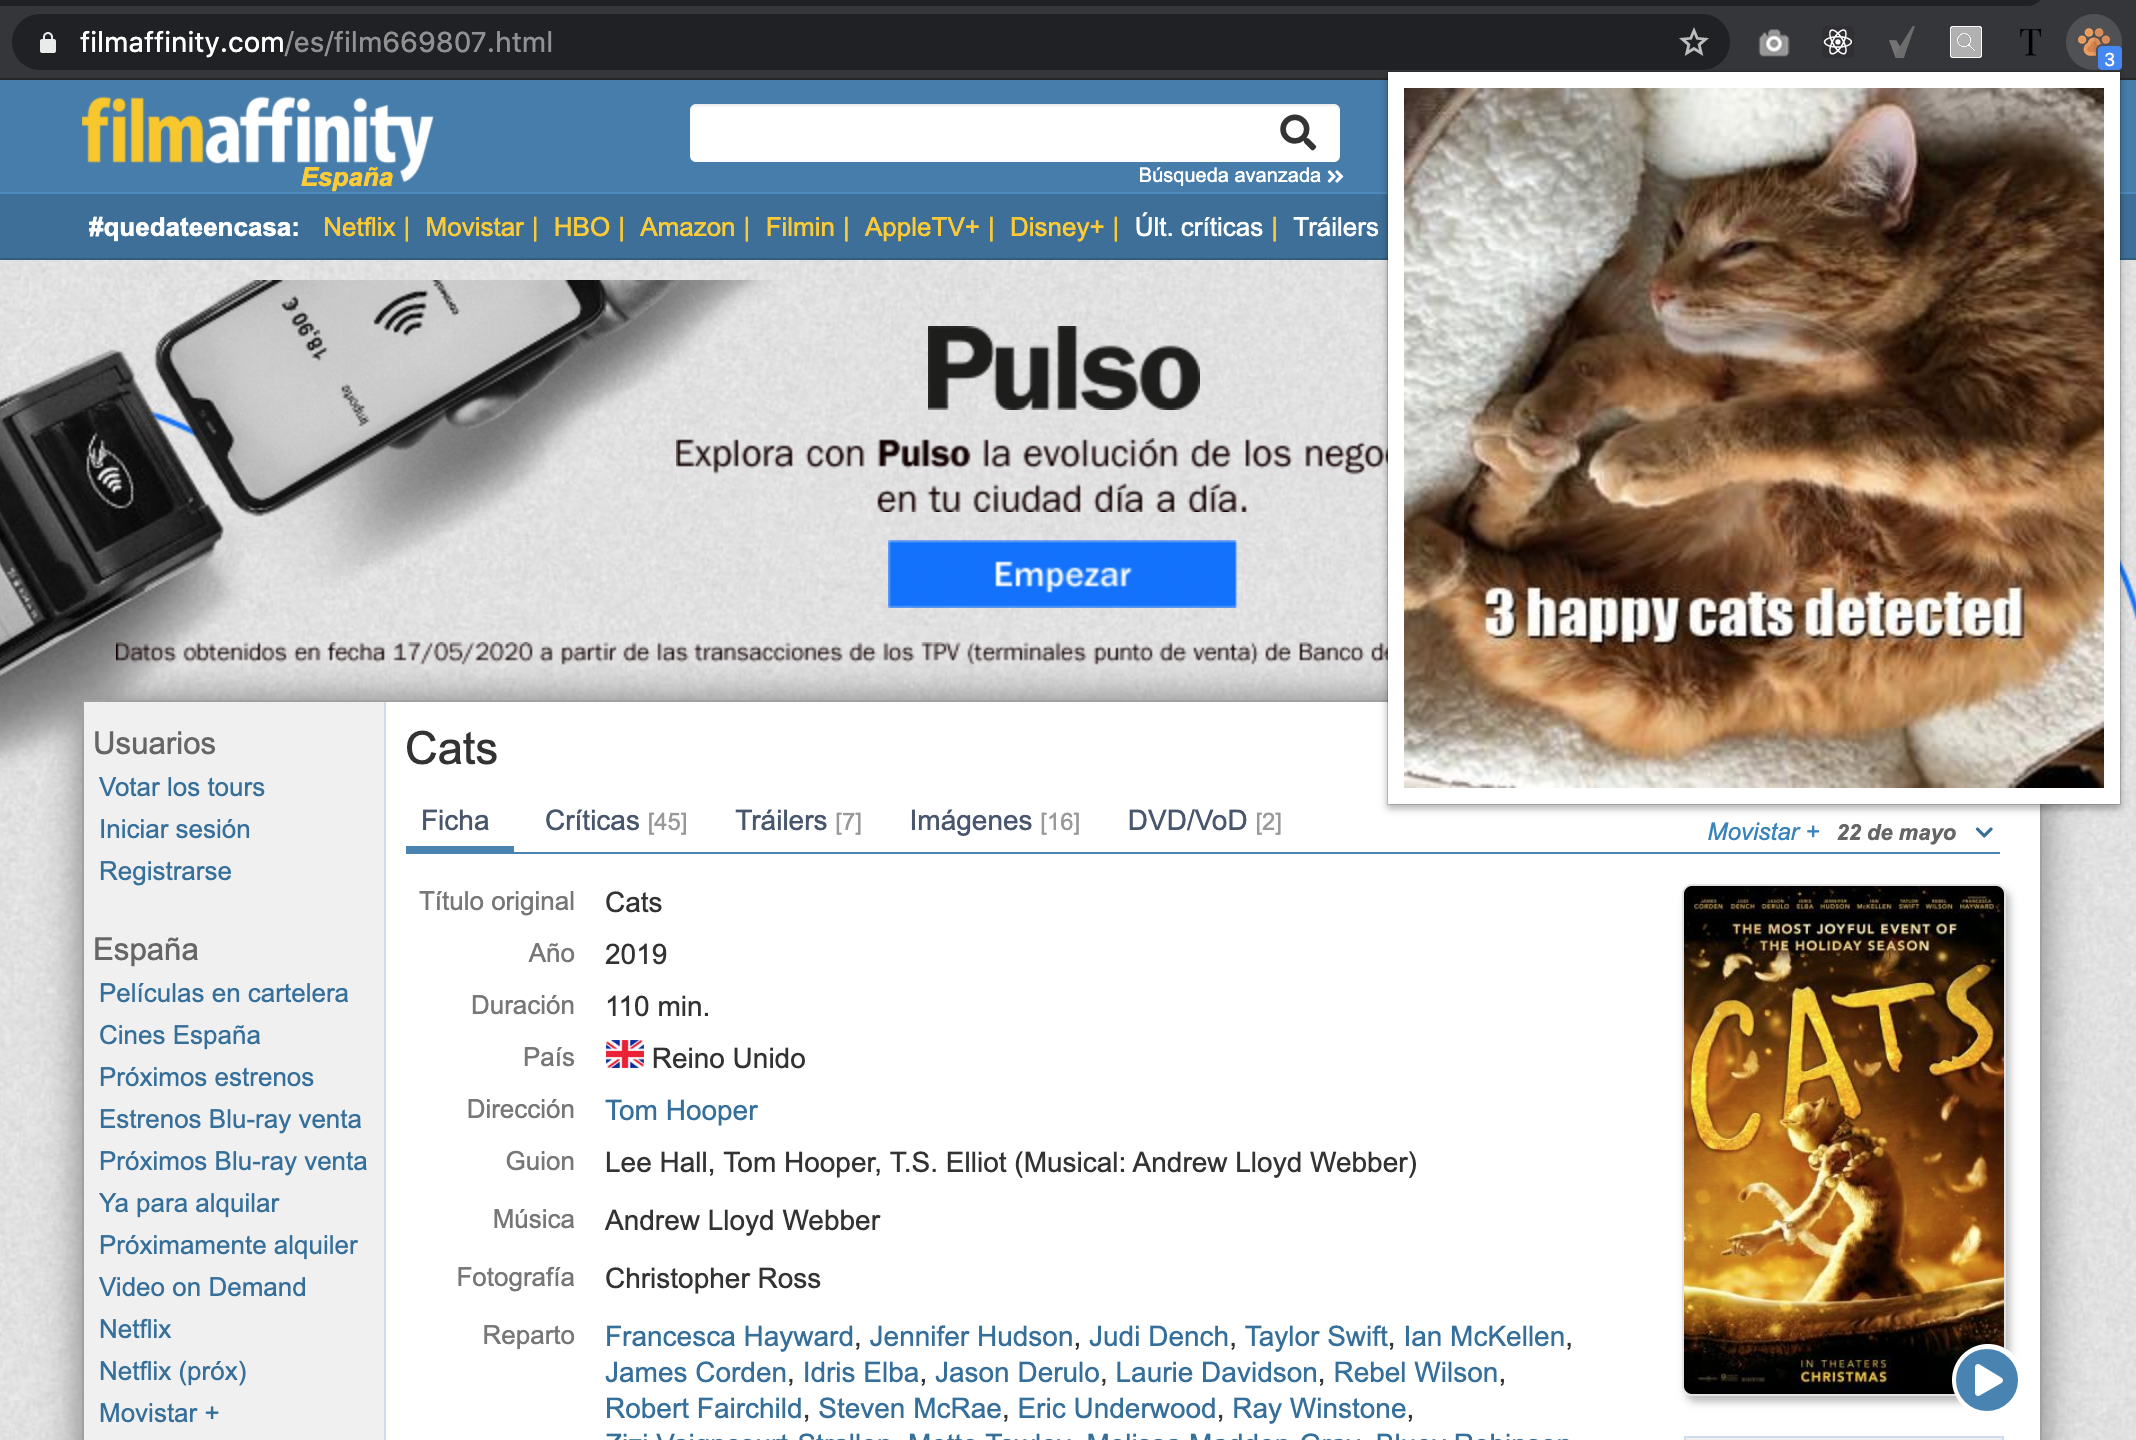
Now, getting to the point of this post. This page action uses a background script that, on page load, calls sends a message to the content script, which in turn counts the number of times the words “cat”, “kitten” or “kitty” appear in our page. After receiving a response, the background task displays a badge over the icon to communicate the number of kittens spot. On clicking on the extension icon, a popup will be shown showing a happy kitten image together with the counter.
Let’s present our extension file structure:
-audios
 |-meow_0.mp3
 |-meow_1.mp3
 |-meow_2.mp3
 |-meow_3.mp3
 |-meow_4.mp3
 |-meow_5.mp3
 |-meow_6.mp3
-images
 |-footprint-16.png
 |-footprint-32.png
 |-footprint-48.png
 |-footprint-128.png
-background.js
-content.js
-manifest.js
-popup.html
-popup.js
It includes the extension icons, some audio files, the manifest, the background script, the content script, and the popup html and js files.
This is how the background script looks like. Comments have been included to guide you through the important stuff:
const maxMeows = 6;

// The extension listens to the onUpdated event, and executes when the page is loaded
chrome.tabs.onUpdated.addListener((tabId, changeInfo, tab) => {
  if (changeInfo.status === "complete" && tab.active) {
    detectCats(tabId);
  }
});

// It executes the cat detection as well when we switch tabs on the active tab
chrome.tabs.onActivated.addListener((activeTab) => detectCats(activeTab.tabId));

const detectCats = (tabId) => {
  // Here we clear the badge
  chrome.browserAction.setBadgeText({ text: "" });
  // Then we send a message to the content script, together with a callback
  chrome.tabs.sendMessage(tabId, { text: "cat_count" }, onCatCount);
};

// This is the callback called by the content script
const onCatCount = (catNumber) => {
  if (!catNumber) {
    deactivateIcon();
  } else {
    // When cats are detected, show an animation on the badge
    animateBadge(catNumber);
  }
};

const deactivateIcon = () => {
  // Here we detect what the active tab is and disable the action
  chrome.tabs.query({ active: true, currentWindow: true }, (activeTab) => {
    chrome.browserAction.disable(activeTab[0].id);
  });
};

const animateBadge = (catNumber) => {
  // Limit meows, we don't want 1000 sounds to be played
  let i = catNumber - maxMeows > 0 ? catNumber - maxMeows : 1;
  let j = 0;
  // Cats will meow at random times
  for (; i <= catNumber - 1; i++, j++) {
    updateBadge(i, j * Math.random() * 400);
  }
  // Last cat should come last, let's give it the highest delay
  updateBadge(catNumber, j * 500);
};

const updateBadge = (catIndex, delay) => {
  // After some specified delay display a number on the badge and play a meow sound
  setTimeout(() => {
    (
      new Audio(chrome.runtime.getURL(`audios/meow_${catIndex % 7}.mp3`))
    ).play();
    chrome.browserAction.setBadgeText({ text: catIndex.toString() });
  }, delay);
};
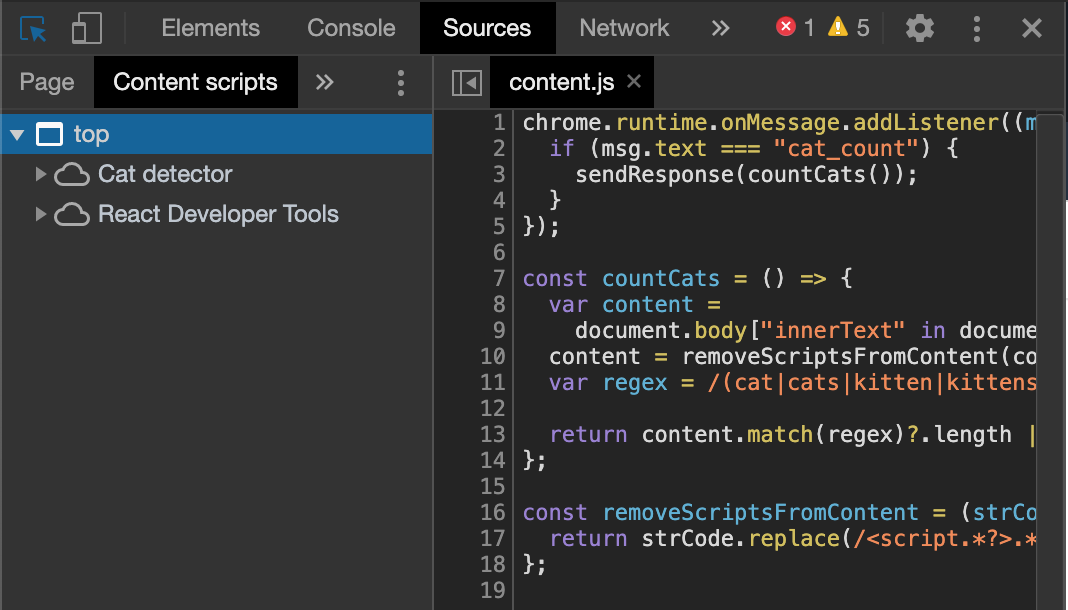
The content script basically receives the cat_count message and responds to it. Some logic has been included to count the cats with a regex expression:
chrome.runtime.onMessage.addListener((msg, sender, sendResponse) => {
  if (msg.text === "cat_count") {
    sendResponse(countCats());
  }
});

const countCats = () => {
  var content =
    document.body["innerText" in document.body ? "innerText" : "textContent"];
  content = removeScriptsFromContent(content);
  var regex = /(cat|cats|kitten|kittens|kitty|kitties)[\s.,]/gi;

  return content.match(regex)?.length || 0;
};

const removeScriptsFromContent = (strCode) => {
  return strCode.replace(/<script.*?>.*?<\/script>/gim, "");
};
The popup html file just displays an image and declares the javascript file:
<html>
  <body>
    <img id="cat_image" />
    <script src="popup.js"></script>
  </body>
</html>
The popup js file executes a function on load which in turn sends a message to the content script to count cats again. This is because popups do not live until they are open, so if some update on the popup needs to be done, it is the popup who needs to start the action:
window.onload = () => {
  chrome.tabs.query({ active: true, currentWindow: true }, (activeTab) => {
    const tabId = activeTab[0].id;
    chrome.tabs.sendMessage(tabId, { text: "cat_count" }, onCatCount);
  });
};

const onCatCount = (catNumber) => {
  document.getElementById(
    "cat_image"
  ).src = `https://cataas.com/c/s/${catNumber}%20happy%20cats%20detected?t=sq&width=350`;
};
Tadaaaa, this is the result of the cat detector extension in action:
Testing locally our extension
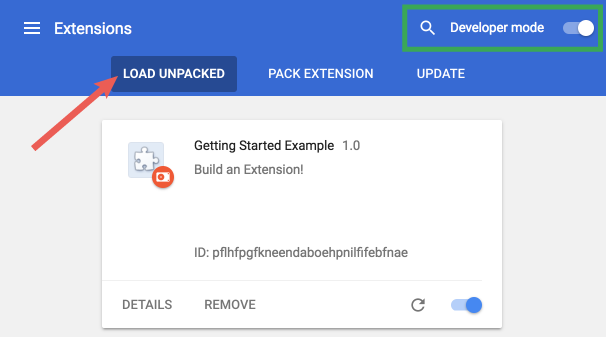
If you want to test your extension in your local machine, you just need to go to the menu item More Tools —> Extensions, then click on Load Unpacked, and select the folder where your manifest and the rest of the files are.
Debugging
Debugging gets particularly complex since every bit of a extension has to be inspected in a different way.
Regarding the background scripts, they are inspected in the extensions. To open the dev tools you need to click on the background page link in the extension details.
Content scripts are inspected in the web page that you are browsing, since they are injected to the page. They are shown in a Content Scripts tab.
I could not found the way to inspect popup scripts, even the console logs got lost somewhere, so showing an alert was the only way to check that the popup was alive and doing stuff.
Publishing
To publish a Google Chrome extension you need to register as a Chrome developer, pay $5 and fill in some information about your extension name, description and images or videos. The process is very similar than the one followed to publish an app in Google Play. After submitting your extension for approval, you need to wait for a response. Negative responses are quite fast -my first extension was rejected for no reason, and I had to send an email to ask for a human review-, positive ones can take a few hours or days.
Going further
The Chrome developer site for extensions provides a great number of sample extensions. These are simple extensions tackling very specific features that can help you learn build extensions.
https://developer.chrome.com/extensions/samples
There are many boilerplate projects out there to help you develop more complex extensions using React, Angular or Vue. Take the following links as a starting point:
- https://github.com/lxieyang/chrome-extension-boilerplate-react
- https://github.com/larscom/ng-chrome-extension
- https://github.com/Kocal/vue-web-extension
Recap
Creating Chrome extensions can be fun, and you can also find many productive scenarios for them. Developing extensions is easy if you know basic web technologies as HTML, CSS and JavaScript. We showed you the basics of a Chrome extension and guided you through the creation of a simple extension.
If you want to check the full extension code, please go to this github repository.
Can you imagine something that could be delivered as a Chrome extension? We would like to hear about your thoughts.
Credits
Photo by Markus Winkler on Unsplash.