Introduction to Kubernetes and Minikube
The aim of this entry is to provide some basic ideas for using Kubernetes to deploy a small microservices-based application.
To do this, we will use an already created repository with a small project containing two microservices and all the Kubernetes scripts to be used in this entry:
https://github.com/abenitezsan/kubernetesDemo
We also have a repository in DockerHub with the images from our microservices (2 small applications created in SpringBoot) ready for use:
https://hub.docker.com/r/abenitezsan/
What is Kubernetes?
Kubernetes is a container orchestration tool that requires at least 3 nodes, one acting as master (or director of the orchestra) and the other nodes as container repositories.
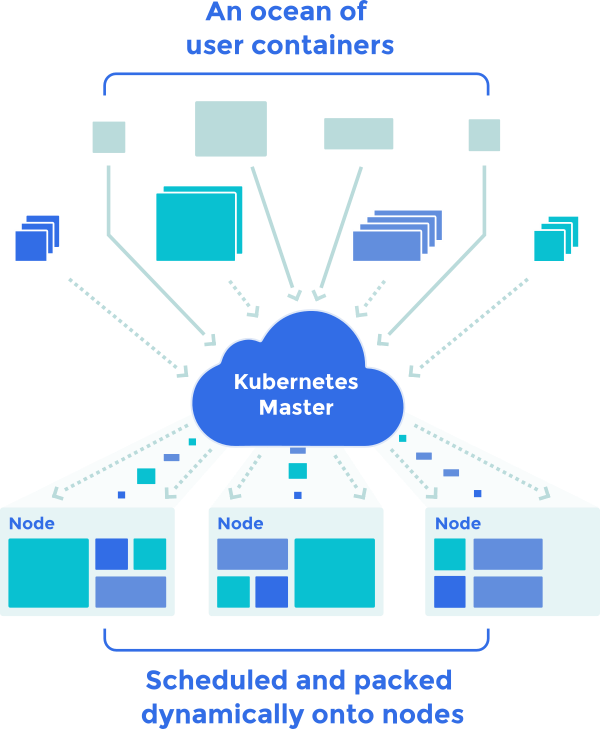
Only the master is used for interaction with Kubernetes; we will give it deployment, start, stop, etc. orders for our containers.
Kubernetes can be broken down into the following elements as follows:
- Pods:
The minimum instance Kubernetes that will use, and that will consist of at least one Docker image, although possibly more. Usually only one is used for ease of control; therefore a pod can range from a SpringBoot application (using a REST API) to a Database (using data from the other pods). Pods are, by definition, stateless. Kubernetes will constantly deploy and destroy them based on current needs. If the pods have to retain data, they must be supported in volumes.
- Deployments:
A deployment in Kubernetes is no more than a pod template, which gives instructions to Kubernetes on how to create the associated pods, how to start the Docker container, how many default replicas we want, etc.
Deployments end by creating replication controllers that automatically maintain the number of replicas specified in the deployment, but do not allow us to change these as desired in the future.
- Services:
The pods are not visible beyond their containers without knowing their IP: port, which changes frequently, and we cannot interact with these from outside. To solve this there are services that act as a layer on top of our pods, managing the load balancing among them and allowing access from the inside (Kubernetes Nodes Network) or outside.
The services use DNS servers, installed on the network (like https://github.com/kubernetes/dns ) for registration and enabling user name access to their pods, so facilitating service discovery.
For example, to access our pods that contain a customer management application deployed in a tomcat, we would only need this URL: http://customerService:8080

- Volumes and Persistent volumes:
As mentioned when discussing the pods, we need volumes to manage data storage/access to our pods’ physical disks.
In applications requiring permanent data storage, we will use persistent volumes, which can exist in several storage systems. Check which ones they are via this link:
https://kubernetes.io/docs/concepts/storage/persistent-volumes/
In this entry, we will only use hostPath as we need to work with Minikube.
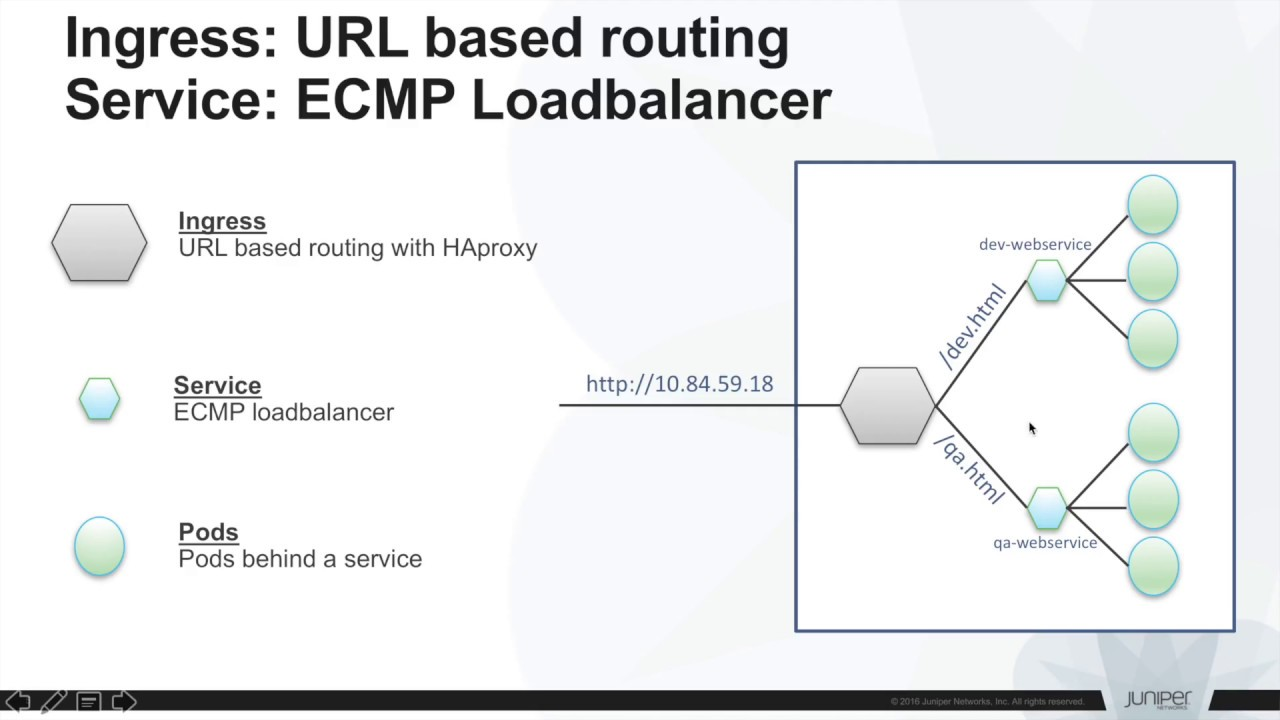
- Ingress Controllers:
We will use ingress to redirect our traffic to the services displayed, grouping all their paths under a single domain.
Ingress is really a convention on which several types of controllers (e.g. nginx or traefik) work to redirect external calls to our services.
What is Minikube?
As mentioned above, Kubernetes needs at least 3 nodes to function, which is a nuisance when trying to conduct local tests. Minikube was created for this purpose. It is a reduced version of Kubernetes, running on a single virtual machine, which acts as master and slave at the same time.
For installation instructions and further information on Minikube, visit our project website:
https://github.com/kubernetes/minikube
You also need to install kubectl to be able to communicate with the Kubernetes server. Installation instructions can be found via the following link:
https://kubernetes.io/docs/tasks/tools/install-kubectl/
Note for Windows users: Although the documentation states that Minikube functions properly with hyper-v, you may well encounter several problems. In this case, we recommend using VirtualBox.
Getting started with Minikube
After installing Minikube on our virtual machine, launch it using a command line:
>minikube start
If everything goes well, the following text will appear:
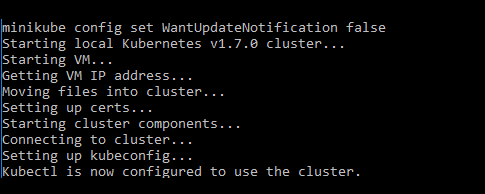
Check that Minikube (and kubectl) have been properly installed, using kubectl to obtain the list of services deployed:
>kubectl get services
We should only see the kubernetes service in the list at the moment.
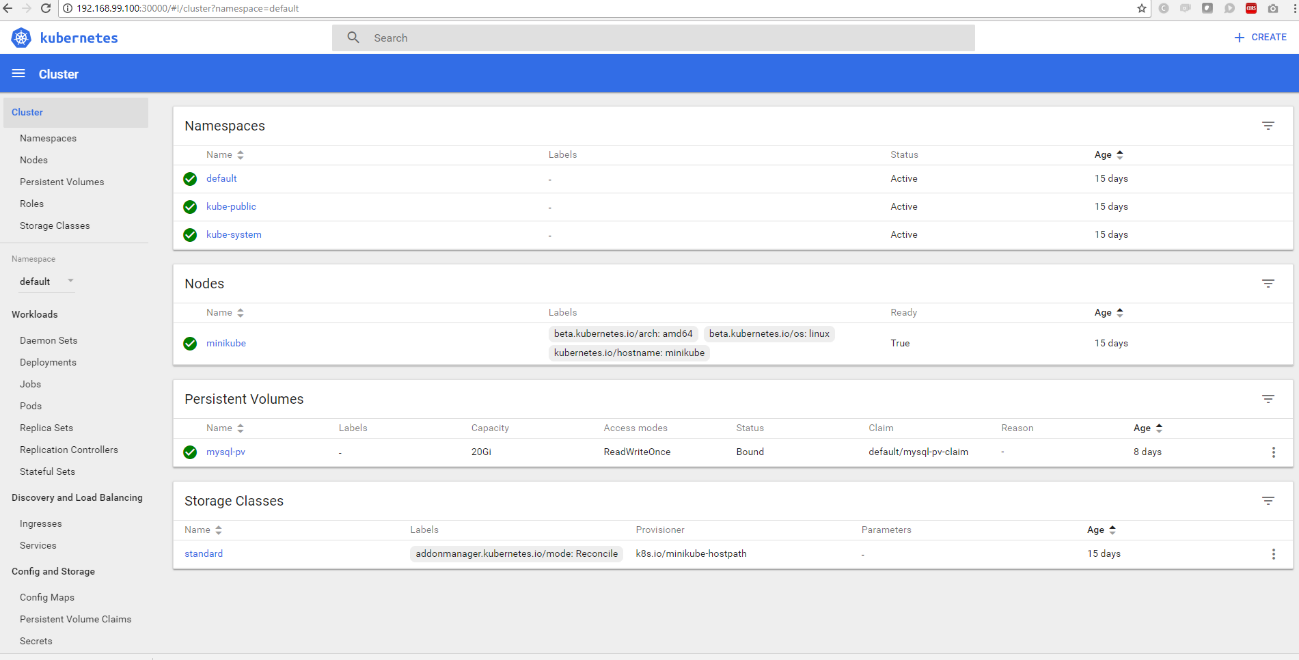
Kubernetes is normally run via commands, although a dashboard can be used to run it. Minikube comes with one installed by default, which can be launched using the following command:
>minikube dashboard
When finished, a browser window opens automatically:
Deploying our application
Deploying MYSQL
Start by deploying a MySQL server, which first requires the creation of a persistent volume, as its data must be stored between launches.
The following script is used for this:
https://github.com/abenitezsan/kubernetesDemo/blob/master/scripts/persistentVolume.yaml
apiVersion: v1
kind: PersistentVolume
metadata:
  name: mysql-pv
spec:
  capacity:
    storage: 20Gi
  accessModes:
    - ReadWriteOnce
  hostPath:
    path: /c/Users/adbe/minikubeSD
What have we done here?
- apiVersion: Api version that we are going to use.
- kind Type of Kubernetes component to create, in this case a persistent volume.
- metadata List of metadata for this element. We are free to enter what we want. We will use the data later to tell other Kubernetes elements how to find this volume.
- storage Specify that we want 20 GB reserved for our persistent volume.
- accessModes ReadWriteOnce means that it will be read and written by a single node. There are other modes available to allow reading and/or writing by multiple nodes.
- HostPath Specify the type of persistent volume that we will use, a path in the virtual machine’s host computer.
- path Physical path of our machine (Warning: /c/
is the only path permitted in Minikube for Windows users)
The script is executed using the following command:
>kubectl create -f persistentVolume.yaml
Next, check that it is been created correctly:
>kubectl get pv
NAME   CAPACITY   ACCESSMODES   RECLAIMPOLICY   STATUS    CLAIM  STORAGECLASS   REASON    AGEMysql-pv   20Gi    RWO          Retain          Bound                                     0d
After creating our persistent volume, we are ready to deploy MySQL using the following script:
https://github.com/abenitezsan/kubernetesDemo/blob/master/scripts/mysqlDeploy.yaml
apiVersion: v1
kind: Service
metadata:
  name: mysql
spec:
  ports:
  - port: 3306
  selector:
    app: mysql
  type: NodePort
---
apiVersion: v1
kind: PersistentVolumeClaim
metadata:
  name: mysql-pv-claim
spec:
  accessModes:
    - ReadWriteOnce
  storageClassName: ""
  resources:
    requests:
      storage: 20Gi
---
apiVersion: apps/v1beta1
kind: Deployment
metadata:
  name: mysql
spec:
  strategy:
    type: Recreate
  template:
    metadata:
      labels:
        app: mysql
    spec:
      containers:
      - image: mysql:5.6
        name: mysql
        env:
        - name: MYSQL_ROOT_PASSWORD
          value: password
        ports:
        - containerPort: 3306
          name: mysql
        volumeMounts:
        - mountPath: /var/lib/mysql
          name: mysql-persistent-storage
      volumes:
      - name: mysql-persistent-storage
        persistentVolumeClaim:
          claimName: mysql-pv-claim
In this script, we really have 3 different Kubernetes scripts, separated by ----, Let us take a look at each of these, differentiating them by their “kind” parameter.
- PersistentVolumeClaim: By creating a persistent volume claim, we ask Kubernetes to search for an amount of disk space available in any persistent volume, and keep it assigned to this claim. Kubernetes will always maintain the space available for all persistent volumes and manage their distribution.
- metadata: The metadata are used to give our claim a name.
- spec: In this section, we tell Kubernetes how much space we want to claim and if we need any special class to oversee the handling of this (not in our case, but this is common in more complex storage systems such as Amazon S3).
- Deployment: Here, we are creating both the deployment template for our MySQL pods and the replication controller configuration.
- strategy => type: Creation strategy type for our pods. Using recreate, we specify that we want the pod created again during each restart, image update, etc.
- template: The pod template is specified in this section.
- metadata: Categorisation of our pod. Use an identifying name so it can be found later by the services.
- image: Docker image in the DockerHub repository with the associated version. With this configuration, Kubernetes is going to search for the image in: https://hub.docker.com/_/mysql/.
- env: Docker image configuration. In our case, we only configure the MySQL root password.
- port: Specify the port our pod will open to communicate. In this case, the default port is used, which raises MySQL (3406) to facilitate the configuration. This port can only be reached from the inside.
- volumeMounts: Here we are telling MySQL to mount a volume with the specific name, indicating the internal container path it’ll use (default MySQL storage path. Again, we are trying to facilitate configuration).
- Volumes: Here, we are specifying the volume mounted in volumeMounts to our claim, created just prior (claimName).
- We have not specified a value for replicas, therefore Kubernetes will automatically only create a single MySQL replica.
- Service: We create a “MySQL” service component and tell it to display our MySQL pods.
- port: With 3306, we establish this as the port always used by the pods associated with this service.
- selector: Selector used to find the associated pods. In this case we are telling Kubernetes that for this service, we want all the pods that have app: MySQL in their metadata.
- type: By default, the services are only visible in the Kubernetes network, but we can display them using some types that allow this, such as NodePort. ( More about types of services via https://kubernetes.io/docs/concepts/services-networking/service/#publishing-services---service-types using targetPort, by not displaying a targetPort, we are not displaying the service with a certain port. Instead, it will be generated automatically.
When we have finished reviewing the configuration, we can create new elements using:
>kubectl create -f persistentVolume.yaml
We can now see if there is a claim concerning our persistent storage:
>kubectl get pv
NAME   CAPACITY   ACCESSMODES   RECLAIMPOLICY   STATUS   CLAIM                 STORAGECLASS   REASON    AGE
mysql-pv   20Gi       RWO       Retain          Bound     default/mysql-pv-claim            	   0d
We can also see if our pods have launched correctly:
>kubectl get pods
NAME                         READY      STATUS             RESTARTS   AGE
mysql-2703443597-wr2t3        1/1       running                 0     27s
And the service:
>kubectl get services
NAME                 CLUSTER-IP   EXTERNAL-IP   PORT(S)          AGE
kubernetes           10.0.0.1     <none>        443/TCP          15d
mysql                10.0.0.54    <nodes>       3306:32077/TCP   45s
As can be seen, it is internally registered in port 3306, but displayed in 32077. At this point, we can use a MySQL manager to connect to our Database and manage it. We can obtain the IP displayed by Minikube by executing:
>minikube status
minikube: Running
localkube: Running
kubectl: Correctly Configured: pointing to minikube-vm at 192.168.99.100
For the following services to function correctly, we need to create the “kubernetesDemo” schema in our database.
Additionally, it is worth restarting Minikube at this stage to check that the persistent storage works properly, and that our schema is maintained after restarts.
Deploying Microservices
When our database is functioning with the schema created, we are ready to deploy our Microservices (SpringBoot applications).
It is interesting to note their database access configuration:
spring.jpa.hibernate.ddl-auto=create
spring.datasource.url=jdbc:mysql://mysql:3306/kubernetesDemo
spring.datasource.username=root
spring.datasource.password=password
As can be seen, we are establishing “MySQL” - the name of the service created in the previous step - as a unique connection chain through the DNS Kubernetes service; this will find our service and redirect us to the corresponding pod.
Now we can see the prepared scripts to create our two services. We are creating a deployment and a service related to it in both.
https://github.com/abenitezsan/kubernetesDemo/blob/master/scripts/CustomerDeployment.yaml
apiVersion: extensions/v1beta1
kind: Deployment
metadata:
  name: customerws
spec:
  replicas: 2
  template:
    metadata:
      labels:
        app: customerws
    spec:
      containers:
      - name: customerws
        image: abenitezsan/customerservice
        imagePullPolicy: "Always"
        ports:
        - containerPort: 8080
---
kind: Service
apiVersion: v1
metadata:
  name: customerws-service
spec:
  selector:
    app: customerws
  ports:
  - protocol: TCP
    port: 8080
    targetPort: 8080
  type: NodePort
https://github.com/abenitezsan/kubernetesDemo/blob/master/scripts/productDeployment.yaml
apiVersion: extensions/v1beta1 # for versions before 1.6.0 use extensions/v1beta1
kind: Deployment
metadata:
  name: productws
spec:
  replicas: 2
  template:
    metadata:
      labels:
        app: productws
    spec:
      containers:
      - name: productws
        image: abenitezsan/productservice
        imagePullPolicy: "Always"
        ports:
        - containerPort: 8080
---
kind: Service
apiVersion: v1
metadata:
  name: productws-service
spec:
  selector:
    app: productws
  ports:
  - protocol: TCP
    port: 8080
    targetPort: 8080
  type: NodePort
Both are very similar and their specification should be very clear following the guidelines provided in the MySQL description. However, a couple of sections deserve attention:
- image: abenitezsan/productservice: As in this case we are using a DockerHub repository, we must specify it.
- imagePullPolicy: "Always": This tells Kubernetes to check if there is a Docker image version to update each time a pod is created..
- replicas: In this case, specify that we always want 2 active replicas of each service.
Execute the two scripts:
>kubectl create -f productDeployment.yaml
>kubectl create -f CustomerDeployment.yaml
Let us look at the status of our new pods:
>kubectl get pods
NAME                          READY     STATUS    RESTARTS   AGE
customerws-3577278556-30m4l   1/1       Running   18         8d
customerws-3577278556-xx239   1/1       Running   13         8d
mysql-2703443597-kss92        1/1       Running   4          47m
productws-1360159399-655rq    1/1       Running   8          8d
productws-1360159399-w0t4p    1/1       Running   18         8d
Four new pods can be seen, two for each of the services we have created. And our new services:
>kubectl get services

NAME                 CLUSTER-IP   EXTERNAL-IP   PORT(S)          AGE
customerws-service   10.0.0.215   <nodes>       8080:30471/TCP   10d
kubernetes           10.0.0.1     <none>        443/TCP          15d
mysql                10.0.0.54    <nodes>       3306:32077/TCP   8d
productws-service    10.0.0.158   <nodes>       8080:31400/TCP   8d
At this point it is interesting to access our new services and check that they are functioning correctly, using the IP obtained with Minikube status and the port obtained in the previous list.
Routing our application (Ingress)
At this point, our application is displayed externally, but is still a little difficult to reach, as the ports must remain available. We use Ingress to solve this, creating rules to route requests to our application directly from the 80/443 ports.
Let us have a look at the Ingress rule below:
https://github.com/abenitezsan/kubernetesDemo/blob/master/scripts/ingress-rule.yaml
apiVersion: extensions/v1beta1
kind: Ingress
metadata:
 name: customer-ingress
 annotations:
  ingress.kubernetes.io/rewrite-target: /
spec:
 rules:
   - host:
     http:
       paths:
         - path: /customer
           backend:
             serviceName: customerws-service
             servicePort: 8080
         - path: /product
           backend:
             serviceName: productws-service
             servicePort: 8080
Noteworthy script aspects:
- ingress.kubernetes.io/rewrite-target: /: This involves an internal rewrite of the routing. For example, if we call
/customer, instead of mapping it customerServiceIP:port/customer by default, the mapping will be customerServiceIP:port. - host: Virtual host where the Ingress rule is applied. In our case, we leave it empty because we want the rule to apply to all requests.
- paths: Kubernetes will use the configuration routed to our requests with the route configured to the service and Port we tell it. *NOTE: In this case, we use the port configured as internal for the service.
Execute our script:
>kubectl create -f ingress-rule.yaml
Let us see if it is been deployed correctly:
>kubectl get ing

NAME               HOSTS     ADDRESS          PORTS     AGE
customer-ingress   *         192.168.99.100   80        8d
This alone does not suffice. In addition Ingress rules, we need a controller to manage them in production environments. Traefik is a popular one:
https://github.com/containous/traefik
On the other hand, in Minikube we can use its controller, included by default (nginx), which we need to activate:
>minikube addons enable ingress
That is it! Now our services should be displayed in our routes, using the IP obtained with Minikube status. Our services can be accessed: