Liferay – Automated development and deployment
Introduction
Software development involves several tasks in building the development environment. In a typical web application scenario such as Liferay these tasks include:
- Installation of a run-time environment (Java)
- Installation and configuration of a database
- Installation and configuration of an application server
- Configuration and integration of external systems
- Environment configuration (Path, Proxy, etc)
These tasks are usually done manually and hence the different environments across developers tend to differ in small parts and the effort is quite high for each developer. Additionally if one is developing for multiple projects there is a chance that these projects each require their own environment. This further leads to possible collisions in environment settings or different versions of artifacts. In the end the software must run successfully on a series of production and test systems. Because of the small inconsistencies it can never be guaranteed that the local environment is exactly the same as the production system. This can lead to subtle errors which are hard to find. Note: All code described here can be found on GitHub: https://github.com/mimacom/liferay-puppet-deployment
Goals
In order to prevent the mentioned issues the following things must be achieved:
- Installation of an isolated environment
- Introduce automated provisioning of this environment
By isolating the system it’s guaranteed that the environment doesn’t interfere with other environments. Automation ensures that the creation of the environments are reproducible and mimic production characteristics.
Overview
Needed artifacts
In order to run a development environment we need the following minimum amount of artifacts:
- Java
- Database (MySQL)
- Liferay application server (bundled with Tomcat)
We are using two tools to help us solve the problem: Vagrant and Puppet.
Vagrant
Vagrant is a tool which allows to create and configure virtual environments. It builds upon providers which do the work of virtualization (e.g. VirtualBox, Vmware, Docker) and integrates various provisioning tools (e.g. Puppet, Chef).
Puppet
Puppet is a provisioning and configuration management tool which allows the installation and configuration of artifacts on a separate node. This example uses Vagrant together with VirtualBox because it’s freely available and can be easily downloaded and tested without any prior knowledge. Puppet is used because it’s a relatively mature provisioning language and serves well to demonstrate the problem solution. VirtualBox can be downloaded here: https://www.virtualbox.org/ Vagrant can be downloaded here: https://www.vagrantup.com/ 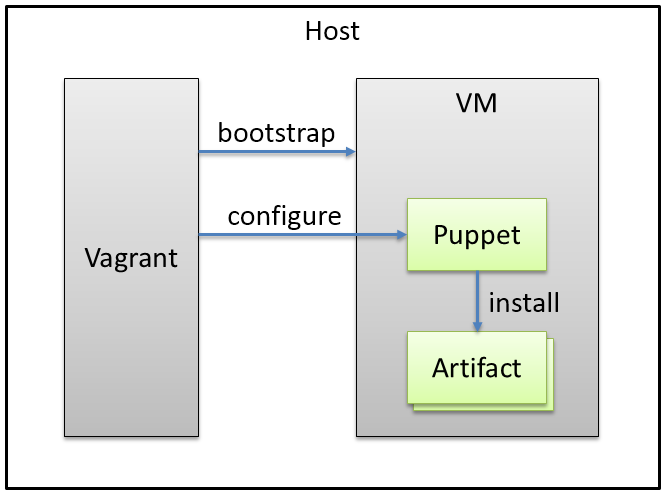 In this scenario Vagrant will be used to bootstrap a virtual machine on the host computer using VirtualBox. When the virtual machine is running it will configure Puppet which then will install and configure our needed artifacts.
Configuring Vagrant
Vagrant uses a single file called Vagrantfile for configuration. The file can be created automatically with the command “vagrant init” in a empty directory. The file must be changed with the following content:
# -*- mode: ruby -*-
# vi: set ft=ruby :
VAGRANTFILE_API_VERSION = "2"
Vagrant.configure(VAGRANTFILE_API_VERSION) do |config|
  config.vm.box = "precise64"
  config.vm.box_url = "http://files.vagrantup.com/precise64.box"

  config.vm.define "liferaydev" do |liferaydev|
  end

  config.vm.hostname = "liferaydev"

  config.vm.provider :virtualbox do |vb, override|
    vb.customize ["modifyvm", :id,
        "--name", "liferaydev",
        "--memory", "2048"]
  end

  config.vm.provision :puppet do |puppet|
    puppet.manifests_path = "manifests"
    puppet.manifest_file = "base.pp"
    puppet.module_path = "modules"
  end

  config.vm.network :forwarded_port, guest: 8080, host: 8080
end
The config.vm.box parameter in line 5 defines the OS image to use. In this case its an Ubuntu Precise 64Bit image and the URL to download is given with the config.vm.box_url parameter in line 6. The box host name is given with the parameter config.vm.hostname in line 11. With the parameter vb.customize in lines 14-16 we define both the VirtualBox machine name as well as the memory for this machine. The parameter config.vm.provision in lines 19-23 defines the folder and file name of the base manifest file and the modules folder. We will later define a file base.pp in the manifests folder which will contain the base puppet node definition. The modules folder will contain the puppet modules for each of the artifacts we are going to create. The last parameter config.vm.network in line 25 is used to setup port forwarding between the host and guest machine. In this case we need to access the Liferay tomcat server and the default port is 8080 so we must forward this port from the guest to the host in order to access the server.
Puppet modules
In this section the needed modules for Java, MySQL and Liferay are described. The first thing to do before any module installation is updating the operating system so in our case the first module deals with that.
Apt
Were using an Ubuntu installation therefore we need to use apt to bring the system in a current state. We create a file in modules/apt-update/manifests called init.pp with the following content:
class apt-update {
  exec {"apt-get-update":
    command => "apt-get update",
    path => "/usr/bin"
  }
}
This defines a block named apt-update (line 1). In line 2 exec is used to run the command apt-get update (line 3) which updates the package definitions. The path specifies the command must run in /usr/bin in line 4. The directory structure used above is a puppet convention. Puppet modules should use this directory structure:
modules
  - module_name
    - manifests (puppet code)
    - files     (files to copy)
    - templates (ERB templates)
Java
For simplicity reasons we are installing the OpenJDK. Therefore we must create a file in modules/java/manifests called init.pp:
class java {
  require apt-update

  package {"openjdk-7-jdk":
    ensure => present
  }
}
The first thing that must be ensured is that we run the package update before installing java. Therefore we require the class apt-update (line 2) to be run before installing java. A package command installs a package from the package manager installed in the used distribution which is done for the package openjdk-7-jdk in line 4.
MySQL
The database we are using in this example is MySQL. We need to install the package, enable the service, set the root password and finally create the liferay database. We create a file called init.pp in modules/mysql/manifests. MySQL is also a package which is installed using apt. Therefore we are installing it using package.
class mysql {
  require apt-update

  package {
    ["mysql-server", "mysql-client"]:
    ensure => installed
  }

  service {"mysql":
    ensure => running,
    enable => true,
    require => Package["mysql-server"]
  }

  $password = "pp8eicxnb29c6"

  exec {"mysql-passwd":
    unless => "mysqladmin -uroot -p${password} status",
    command => "mysqladmin -uroot password ${password}",
    path => ["/usr/bin", "/bin"],
    require => Service["mysql"]
  }

  $l_db = "lportal"
  $l_user = "liferay"
  $l_pass = "s3cr3t :D"

  exec {"create-liferay-db":
    unless => "mysql -u${l_user} -p${l_pass} ${l_db}",
    command => "mysql -uroot -p${password} -e \"create database ${l_db};grant all on ${l_db}.* to ${l_user}@'localhost' identified by '${l_pass}'; flush privileges;\"",
    path => ["/usr/bin", "/bin"],
    require => Exec["mysql-passwd"]
  }
}
We must ensure that the package manager was updated before (using require in line 2). Then we can install both the mysql-server and client package (lines 4-7). The client is needed for setting up the password and initializing the Liferay database below. We add MySQL as a system service using service in lines 9-13. Here we can see that we need to define a dependency to the package installation (line 12). After that we set the MySQL root password in lines 17-22. Using the unless keyword we make sure that this command only runs if the password was not yet set. The last thing we do is to create the database for Liferay (lines 28-33). We again check with unless that this command was not executed before.
Liferay
Next we need to install the Liferay server. The following script must be placed in a file called init.pp in modules/liferay/manifests.
class liferay {
  require java, mysql

  $install_path = "/opt/liferay"

  exec {"stop-liferay":
    command => "${install_path}/liferay-portal-6.2.0-ce-ga1/tomcat-7.0.42/bin/catalina.sh stop",
    onlyif => "test -f ${install_path}/liferay-portal-6.2.0-ce-ga1/tomcat-7.0.42/bin/catalina.sh",
    path => ["/usr/bin", "/bin"],
  }

  exec {"clean-liferay":
    command => "rm -fR ${install_path}/*",
    path => ["/usr/bin", "/bin"],
    require => Exec["stop-liferay"]
  }

  package {"wget":
    ensure => present
  }

  exec {"get-liferay":
    command => "wget http://downloads.sourceforge.net/project/lportal/Liferay%20Portal/6.2.2%20GA3/liferay-portal-tomcat-6.2-ce-ga3-20150103155803016.zip -O /home/vagrant/liferay.zip",
    cwd => "/home/vagrant",
    path => ["/usr/bin", "/bin"],
    require => Package["wget"],
    timeout => 600
  }

  package {"unzip":
    ensure => present
  }

  file {"${install_path}":
    ensure => "directory"
  }

  exec {"unzip-liferay":
    command => "unzip /home/vagrant/liferay.zip",
    cwd => "${install_path}",
    require => [Exec["get-liferay"], Package["unzip"], File["${install_path}"], Exec["clean-liferay"]],
    path => ["/usr/bin", "/bin"],
  }

  file {"portal-ext.properties":
    path => "${install_path}/liferay-portal-6.2-ce-ga3/tomcat-7.0.42/webapps/ROOT/WEB-INF/classes/portal-ext.properties",
    source => "puppet:///modules/liferay/portal-ext.properties",
    require => Exec["unzip-liferay"]
  }

  exec {"start-liferay":
    command => "${install_path}/liferay-portal-6.2-ce-ga3/tomcat-7.0.42/bin/catalina.sh start",
    onlyif => "test -f ${install_path}/liferay-portal-6.2-ce-ga3/tomcat-7.0.42/bin/catalina.sh",
    path => ["/usr/bin", "/bin"],
    require => File["portal-ext.properties"]
  }
}
Liferay requires both java and the database so the respective classes must be added to the require keyword in line 2. We download the archive bundled with Tomcat using wget so this package must be installed on the machine using the package command (line 18-20). Then we download the Liferay archive bundled with Tomcat using the wget command in lines 22-28). We need the tool unzip so we install it with the package manager (lines 30-32) and make sure that the destination directory is present in lines 34-36. The next command unzip-liferay in lines 38-43 extracts Liferay to the destination directory. Here we can see that we require a list of steps to be executed before this command can be run (line 41). The first is the command get-liferay for the artifact download, the unzip package installation, the install path creation and a step we haven’t covered yet: clean liferay. This command (in lines 12-16) makes sure that the destination directory is removed before the new installation is run. And this step requires another step stop-liferay in lines 6-10 which makes sure that the Liferay server is stopped before the directory is removed. We need to configure Liferay to use the previously installed MySQL instance. We can configure the database connection using the file portal-ext.properties which is located in WEB-INF/classes in the root web application. We create this file in the folder modules/liferay/files with the following content:
jdbc.default.driverClassName=com.mysql.jdbc.Driver
jdbc.default.url=jdbc:mysql://localhost/lportal?useUnicode=true&characterEncoding=UTF-8&useFastDateParsing=false
jdbc.default.username=liferay
jdbc.default.password=s3cr3t :D
We need to make sure that the user and password matches the $l_user and $l_pass variables defined in the MySQL file. The database value $l_db variable must also match the value after the localhost part of jdbc.default.url. In lines 45-49 of the Liferay script the file portal-ext.properties is copied to the destination directory in the root application. The next step is to start the Liferay server. We are using the catalina.sh script provided with tomcat (lines 51-56) and of course this can only be run after the portal-ext.properties file is generated. Therefore we must add the require attribute to the command in line 55. The last step is to create a node object where we include all those created files. The file is already referenced in the vagrant definition with base.pp in the folder manifests so we must create the file manifests/base.pp with the following content:
node liferaydev {
  include java
  include mysql
  include liferay
}
After starting the server with vagrant up it executes all the steps and we should see something similar to this:
Bringing machine 'liferaydev' up with 'virtualbox' provider...
==> liferaydev: Importing base box 'precise64'...
==> liferaydev: Matching MAC address for NAT networking...
==> liferaydev: Setting the name of the VM: liferay-puppet-deployment_liferaydev_1423469480390_36555
==> liferaydev: Clearing any previously set network interfaces...
==> liferaydev: Preparing network interfaces based on configuration...
==> liferaydev: Forwarding ports...
==> liferaydev: Running 'pre-boot' VM customizations...
==> liferaydev: Booting VM...
==> liferaydev: Waiting for machine to boot. This may take a few minutes...
==> liferaydev: Machine booted and ready!
==> liferaydev: Checking for guest additions in VM...
==> liferaydev: Setting hostname...
==> liferaydev: Mounting shared folders...
==> liferaydev: Running provisioner: puppet...
==> liferaydev: Running Puppet with base.pp...
==> liferaydev: stdin: is not a tty
==> liferaydev: notice: /Stage[main]/Apt-update/Exec[apt-get-update]/returns: executed successfully
==> liferaydev: notice: /Stage[main]/Java/Package[openjdk-7-jdk]/ensure: ensure changed 'purged' to 'present'
==> liferaydev: notice: /Stage[main]/Mysql/Package[mysql-client]/ensure: ensure changed 'purged' to 'present'
==> liferaydev: notice: /Stage[main]/Mysql/Package[mysql-server]/ensure: ensure changed 'purged' to 'present'
==> liferaydev: notice: /Stage[main]/Mysql/Exec[mysql-passwd]/returns: executed successfully
==> liferaydev: notice: /Stage[main]/Mysql/Exec[create-liferay-db]/returns: executed successfully
==> liferaydev: notice: /Stage[main]/Liferay/Exec[clean-liferay]/returns: executed successfully
==> liferaydev: notice: /Stage[main]/Liferay/Package[unzip]/ensure: ensure changed 'purged' to 'present'
==> liferaydev: notice: /Stage[main]/Liferay/File[/opt/liferay]/ensure: created
==> liferaydev: notice: /Stage[main]/Liferay/Exec[get-liferay]/returns: executed successfully
==> liferaydev: notice: /Stage[main]/Liferay/Exec[unzip-liferay]/returns: executed successfully
==> liferaydev: notice: /Stage[main]/Liferay/File[portal-ext.properties]/ensure: defined content as '{md5}9e8ba62e8ce6f41f3a05fdde2e68b460'
==> liferaydev: notice: /Stage[main]/Liferay/Exec[start-liferay]/returns: executed successfully
==> liferaydev: notice: Finished catalog run in 183.45 seconds
The line containing “finished catalog run” means that all steps were triggered on the guest machine. Liferay is starting but it takes sometime for the portal to finish. We can access the guest machine with ssh (command vagrant ssh). Inside the guest the tomcat log file can be monitored for the Liferay start up located here: /opt/liferay/liferay-portal-6.2-ce-ga3/tomcat-7.0.42/logs/catalina.out When the server is started we can access the Liferay portal under http://localhost:8080.
Conclusion
Using a few simple Puppet modules together with Vagrant it was demonstrated how an isolated development environment can be automatically installed. There are puppet modules available for a lot of additional tasks e.g. there is a MySQL module which does most of the tasks outlined above automatically. More information on puppet modules can be found on the puppet labs site: https://forge.puppetlabs.com/puppetlabs The environment can easily be reused because only the provisioning scripts must be shared with version control. Then every developer in a project is using the exact same environment which in turn can be an exact copy of the production environment.
Further thoughts
This example could be adapted so that it meets real project requirements. Here are a few ideas what could be done:
- Installation of other Java versions or databases (some are more complex because of automatic licence agreement acceptance)
- Installation of web servers e.g. Apache HTTPD
- Liferay project specific customization
- Deployment of Liferay artifacts using synced folders: https://docs.vagrantup.com/v2/synced-folders/
- Usage of productivity tools like jRebel. Together with synced folders code and resources can be automatically refreshed on the guest environment while the developer is working normally in the IDE on the host machine.
- Installation of staging environments (test servers, clustering).