How we Upgraded Pivotal Cloud Foundry from 1.9 to 1.12 in 72 Hours
Never touch a running system. That I learned a couple of years ago: Why should I change it when it's working? There are several reasons to do it, especially from a security perspective.
Since Pivotal is no longer supporting PCF version 1.9, there is a really good reason to upgrade. Starting with PCF 1.9 and the current release is PCF 2.1, there is a long migration path. At the point of our migration the latest release was PCF 2.0, so we decided to upgrade only to PCF 1.12 to ensure that the system is stable. Unfortunately, it's not possible to go directly through the complete process, you need to upgrade each step manually. That means, you need at least three upgrades from PCF 1.9 to PCF 1.12 (PCF 1.10, PCF 1.11 and PCF 1.12). Each of the upgrades took us in the best case at least eight hours of waiting time for PCF to complete it.
In addition, our installation started at PCF 1.4, that means we still used a Postgres CC and UAA database, so a partially automated migration of a production database was necessary. Keeping that in mind, it is a challenge to get this upgrade in 72 hours, especially because each upgrade needs also quiet some time to prepare it.
Our Installation
At this customer we have three different environments:
- Sandbox environment to test Cloud Foundry deployments
- Development environment for app developers
- Production environment
The Development and Production environments are really similar, they were set up in the same time range. Unfortunately, the Sandbox environment is a new installation with PCF 1.9. On this environment we haven't had the chance to test the database migration. Except of that, it was quiet similar but with less users.
On the production environment we have approximately 250 apps, 15 organizations and 150 users. Special on the installation is, that we have approximately 50 dedicated redis nodes.
Strategy
We started the migration on the Sandbox environment, which was not exactly like the two other systems we have had to migrate.
At this migration we documented everything what we have done, each step independent if it was a step on the command line or in the Operations Manager.
The protocol was structured into logical parts, first a preparation, followed by the execution from an Apply Changes in the Operations Manager.
For ensuring the same version on all environments, we wrote also down the versions we used.
In our terms means .latest in a version context not the .latest version when we have done the upgrade, it was the latest release which was available when we started on our Sandbox environment.
In addition, during the first test for each of those we have written down how long the preparation toked, how long the execution toked, how much downtime we have had and what have changed. Furthermore, we documented which environments already up to date and which of them still in progress and the steps which we already have executed.
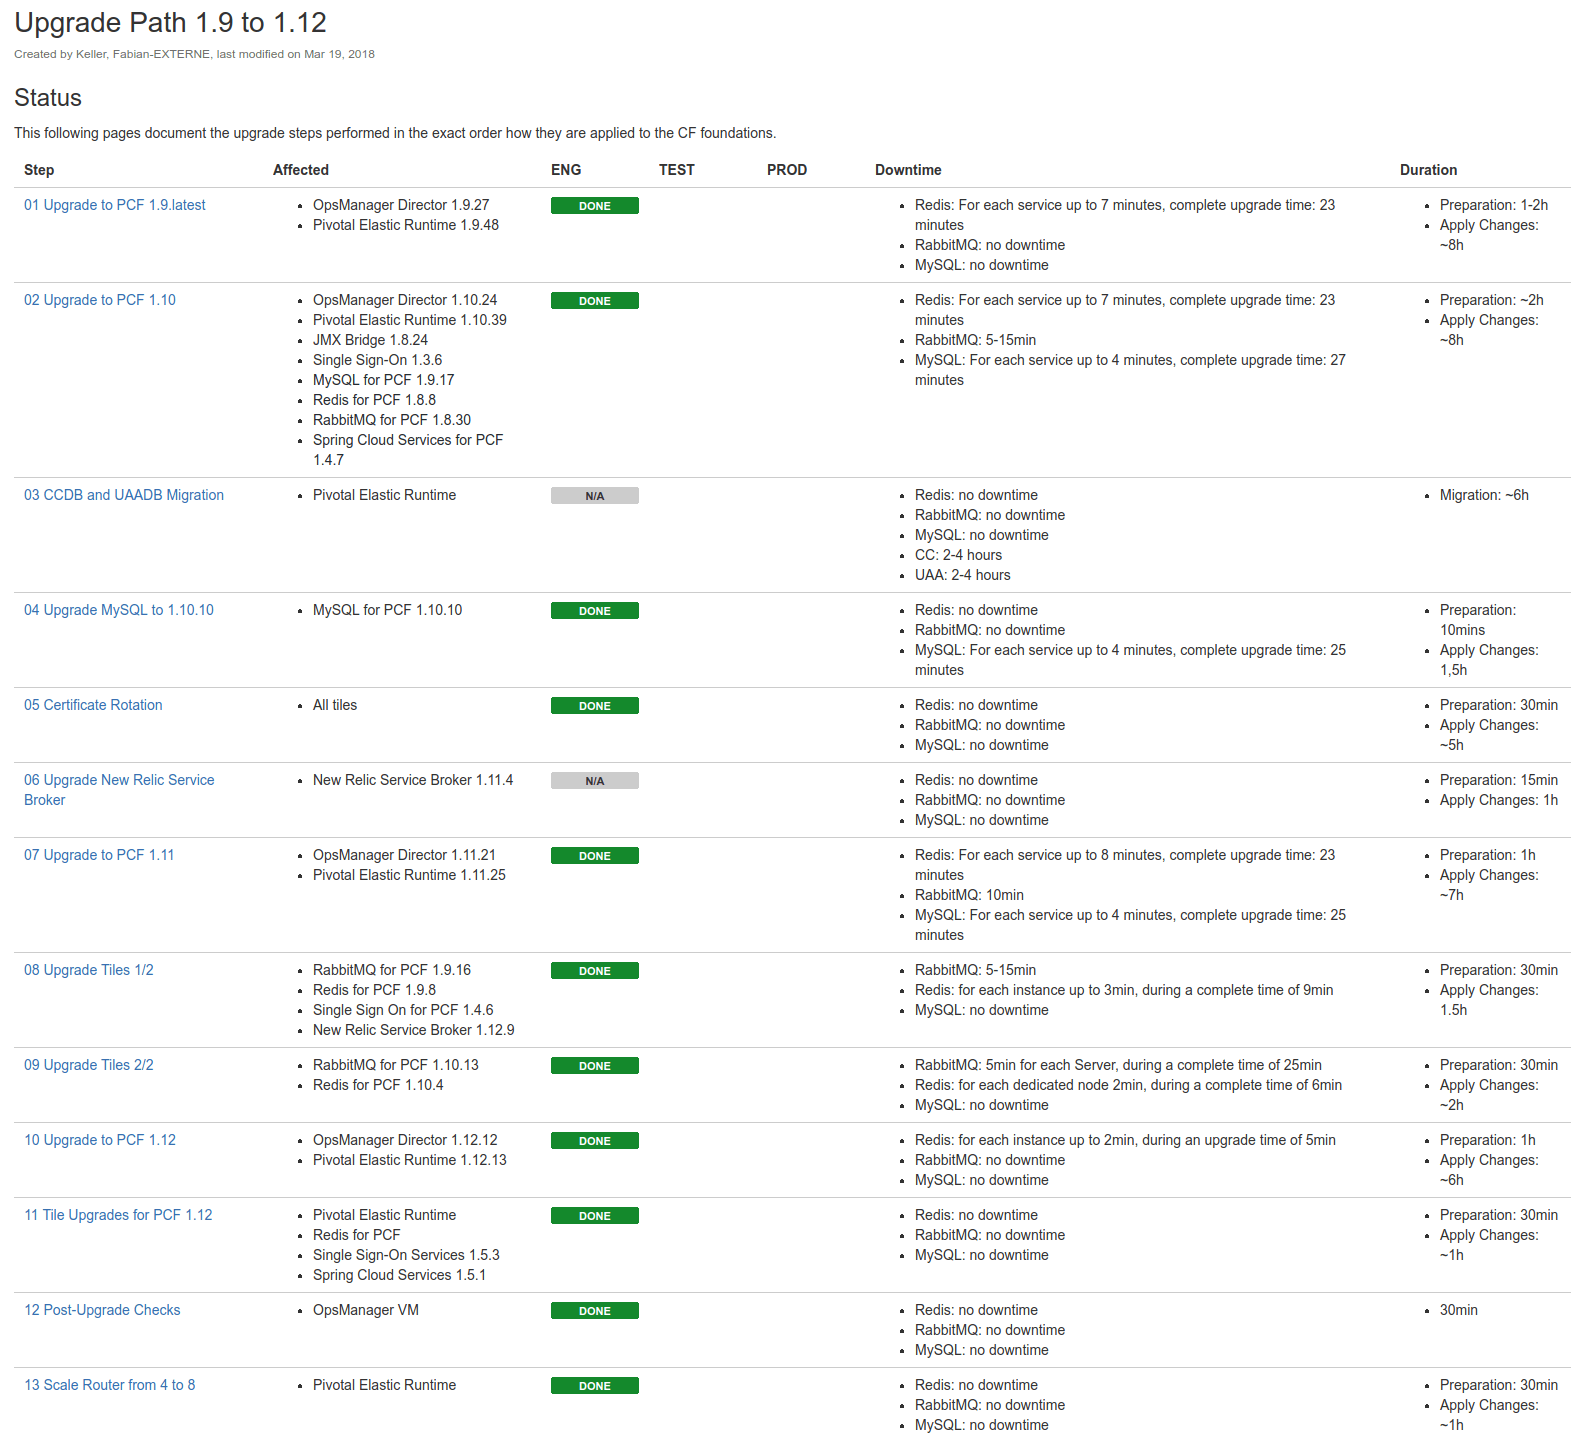
Our starting release was for the Operations Manager 1.9.0 and for the Elastic Runtime 1.9.7, so both of them quiet old. Since we wanted to avoid that we get into trouble when we directly upgrade to PCF 1.10, we decided to take one more step, we upgrade to 1.9.latest. The result of that was, that we need one additional Apply Changes and long upgrade step. Also there were several additional Apply Changes for tile upgrades which we separated from PCF upgrades, whenever it was possible. For the upgrade path we also verified everything against the PCF Compatibility Matrix. So we ended up with an migration path with approximately 56 hours of work in the best case if every Apply Changes works on the first time.
In the following picture you can see our upgrade path for our PCF environment. Later we also scheduled the upgrade plan for production to have a time line.
Tool Support
With all products including we ended up with 20 necessary tile upgrades. Manually uploading them to PCF is a lot of work. In addition we wanted to be offline ready. Therefore manually uploading them to the Operations Manager was not an option for us. Furthermore, one aim from us was to ensure that we are doing exact the same upgrade on all environments. That's why we decided to not download them directly from the internet.
Performing the Upgrade from a Jump Host
For executing our upgrades, we ended up to use a jump host in our datacenter to upload all products. From this host, we downloaded all products for PCF and uploaded them to our PCF installations. In addition, we used this host to export and import the Operations Manager installation during the Operations Manager upgrade.
Writing pcfup for Semi-Automatic Pivotal Cloud Foundry Upgrades
For minor upgrades there are several pipelines to do them fully automated with Concourse. Unfortunately, there is nothing similar for major upgrades. That's the reason why we developed a small tool called pcfup, which is doing reoccuring work for us.
At the beginning the main focus of pcfup was to download products from Pivotal Network, upload them to the Operations Manager and stage them. The commandline was pretty simple:
# pcfup product <product> <version>
pcfup product cf 1.9.48
Therefore we also needed in some cases new stemcells, so we implemented a stemcell download from Pivotal Network and upload them to the Operations Manager. This operation was included in the product download. We unpacked the product to figure out which stemcell version is necessary, detected if the version was available in our Cloud Foundry installation and uploaded it otherwise.
We have not started the development of pcfup without additional tools, for almost all of our sub-tasks there was a CLI from the specific tool already available. The problem with existing CLIs is, that every CLI is build to communicate with a specific product. There is currently no CLI which is build to do tasks like "do a product upgrade".
pcfup is based on the CLIs om, pivnet and for parsing JSON also jq. It is optimized to run on the Operations Manager without further adaptions. In our case it was not really useful to install it on the Operations Manager, since our Operations Manager was most times not living for more than 24 hours, afterwards we replaced it with a new one.
Dealing with Multiple Cloud Foundry Environments
pcfup was cool for doing the work, but for each environment there still a lot of credentials necessary.
For managing credentials and environments, we introduced a small script which we sourced in every bash which we used to upgrade the installation:
export PS1="\e[1;36m[\u@\h \W]\$ \e[m "
export OM_TARGET="<ops-manager-host>"
export OM_USERNAME="<ops-manager-user>>"
read -s -p "Enter OM Password: " OM_PASSWORD
export OM_PASSWORD
export PIVNET_TOKEN="<pivnet-access-token>"
export IAAS="vsphere"
To detect, on which environment you are working, we introduced also different colors.
Those colors were set with the PS1 variable in the file above.
Except the PIVNET_TOKEN, all of the variables are respected from pcfup.
Apply Changes Support with Push Notifications
Furthermore, we introduced other sub commands for stuff we needed to do often, for example for export-installation and import-installation.
To be able to do the installation in such a short time, it was also necessary to figure out the state of the installation and when it is done.
To avoid setting a timer or looking every second to a monitor screen, we introduced the simple command wait-for-installation.
In combination with other tools it is possible to play for example a song after the completion of an installation.
With combination of bash tools it is also possible to react on positive or negative installation progress:
pcfup wait-for-installation; nvlc ac-dc-highway-to-hell.mp3
Hint: You shouldn't use that if you are traveling a lot and switching between networks. For me it happend two times that I was walking out of a house and in my backpack it started to play AC DC. Another option is turing the keyboard light into a flash light.
Database Migration
Pivotal Cloud Foundry was using Postgres in it's early stages as internal database for the Cloud Controller (CC) and User and User Account and Authentication (UAA) server. Before upgrading to PCF 1.12, these Postgres databases had to be migrated to MySQL. After the first training we were able to do it with less than one hour downtime. Downtime for the database migration means not, that Applications are not reachable. But during the downtime it is not possible for engineers to sign in the PCF installation or even see the current state of the applications.
Luckily, everything worked well at the migration, except one small issue I would like to mention:
During the last migration step we received for the table delayed_jobs the message:
FAILED: 2 rows missing
Missing IDs: 682546,682547
This message does not sound good, but if you are looking into the old database and the new database, you will figure out that all rows are available.
The differences are a minor detail, the schema of the MySQL database does not allow that the updated_at value is null.
Therefore, the current date of the migration is inserted that.
We have verified on both that the output is the same:
# On Postgres CLI:
ccdb=> select * from delayed_jobs where id = 682546;

# On MySQL CLI:
MariaDB [ccdb]> select * from delayed_jobs where id = 682546\G;
Afterwards, you can continue the upgrade.
Hint: You should reach out to Pivotal or a Pivotal partner before you are doint that upgrade. There are a couple of unpublished information and troubleshooting guidelines with which they are able to support you.
Troubleshooting
We have had only a few issues on all of our upgrades. In general everything was pretty stable. But I would like to show you our greatest challenges during the upgrade.
Buildpack Dependency
Since our installation was pretty old at the beginning, we upgraded the buildpacks manually. To avoid that users do not use the old buildpack, we changed the order. Unfortunately, there are several apps which are using the automatic detection of the buildpack. In case of the Java buildpack, it is unfortunately not possible to use the buildpack with less than 1 GB of memory without explicit Java options:
[ERR] Cannot calculate JVM memory configuration: There is insufficient memory remaining for heap. Memory limit 512M is less than allocated memory 710215K (-XX:ReservedCodeCacheSize=240M, -XX:MaxDirectMemorySize=10M, -XX:MaxMetaspaceSize=147015K, -Xss1M * 300 threads)
We just decided to reorder the Java buildpacks during the upgrade time until all products are fixed.
Missing Migration Support for New Relic Service Broker
Reading the documentation of the New Relic Service Broker you will figure out, that if you are using New Relic Service Broker 1.1.0, you will not be able to upgrade:
- No upgrade paths are required for older verisons of the tile, since versions older than v1.9.0 are not supported.
- Versions v1.12.6+ of the tile support migration from older versions of the tile, and preserve existing services and service plans.
- If you are using tiles older than v1.11.4, you must first upgrade to v1.11.4, then upgrade to the latest version of the tile.
We were really confused when we read the first of those bullet points. First of all we started to have a look into the bundles of the different versions, fortunately they are available at GitHub. The funny thing about that, the version 1.9.0 mentioned above is not available at all. You can only find version 1.9.1, which we assumed is a direct follow up from version 1.9.0. The bundle shows that only the Manifest File inside the Tile is different. Since we were able to figure out which properties are changed from 1.1.0 to 1.9.1, the upgrade was not that dangerous. Starting with 1.9.1, it was getting a bit more challenging because we have had also different binaries. We ended up with contacting the commiter of the GitHub repository and he told us that it is safe to upgrade to 1.11.4 and from there to the latest version.
Redis Timeout during Shoutdown
I already mentioned before, we have a lot of Redis instances and especially dedicated nodes. During the upgrade our Apply Changes failed at some point with the following error message:
Started updating instance dedicated-node
Started updating instance dedicated-node > dedicated-node/938d4148-74e1-48db-827f-c3758eba0692 (2) (canary). Failed: Action Failed get_task: Task f37777db-9cdb-4f19-862e-a4dfa45efacb result: Stopping Monitored Services: Stopping services '[redis]' errored (00:00:36)

Error 450001: Action Failed get_task: Task f37777db-9cdb-4f19-862e-a4dfa45efacb result: Stopping Monitored Services: Stopping services '[redis]' errored
The reason why this error occurs is that Redis is not able to shutdown in the monit timeout of 30 seconds.
After this timeout you can sometimes see some kind of failure state.
The solution which is suggested for that is to upgrade to version 1.10, in this version it is fixed.
This is a really helpful solution, especially if you are running the Redis tile version 1.8.8.
Fortunately, our contact at Pivotal Support figured out a workaround how we can proceed with the upgrade:
$ bosh ssh dedicated-node/2

# on dedicated-node/2
$ sudo su -
$ monit stop all
$ exit

# from Operations Manager
$ bosh start dedicated-node/2
In this case you are stopping the services on the dedicated-node before the upgrade starts.
This increases the downtime for your node, because then it is down until you execute the start command.
Another solution if you are aware of it, you can do the monit stop all on all affected dedicated-node's at the beginning of the Redis tile deployment.
Then you increase the downtime, but you are saving some time because you do not need to restart the Apply Changes.
Order of Products During Apply Changes
I haven't told you yet, we failed with the plan of 72 hours. It took us 18 hours more, and finally this issue was the last reason. After the Redis timeout issue, we were already behind our timeline, but it was still possible to make it. The issue with Redis was not solved, since we haven't directly upgraded redis afterwards, we used the workaround. Finally, we started with Redis 1.8.8 our upgrade to PCF 1.11. After executing the apply changes it failed within a few minutes because Redis was in the installation order before the Elastic Runtime:
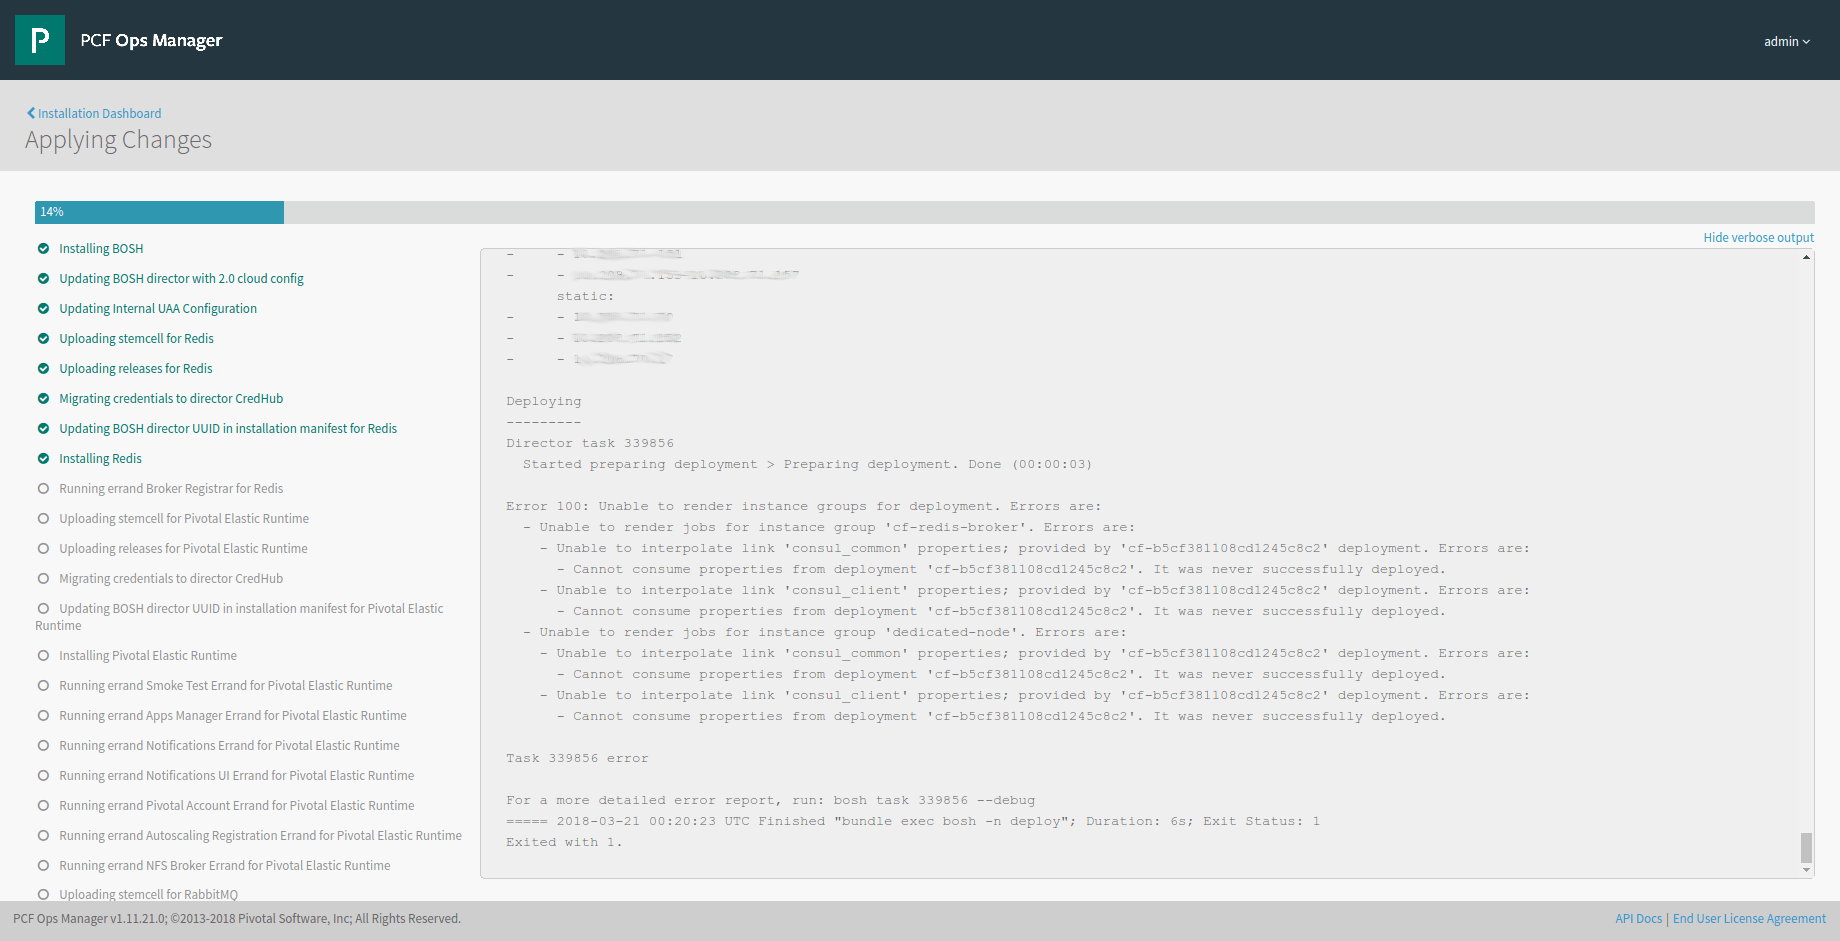
If you are reading the documentation of Redis 1.8.8 in the Pivotal Network, you will figure out that PCF 1.8.8 is not compatible with PCF 1.11. Unfortunately, when we started we only looked into the Compatibility Matrix which erroneously confirmed the compatibility (has been fixed since then).
Root cause of this issue is, that at least with Operations Manager 1.11 the Product is containing dependencies to other products.
All of those dependencies are used to build a dependency tree.
This tree is used to determine the order of all products during the upgrade.
The additional attribute rank which is included in the product configuration is only used to visualize the dashboard, so you can ignore it completely.
The important attribute is the following:
requires_product_versions:
- name: cf
  version: "~> 1.9"
We ended up with a manual modification of the template in the /var/tempest directory.
Another solution would be to upgrade p-redis directly to 1.9.x or to do the upgrade on the fly.
Conclusion
In general it was a challenging upgrade for all involved persons. It is possible to do such a upgrade in that short time, but you should be aware that every time some small problem can occur and delay the timeline. In general, you should prepare the upgrade first and test it in a dedicated environment, than it is easier to process manual steps. For example, our second database migration took half of the time than the first. Be aware, you can have other issues on each environment. We have had two of four issues only on our production environment. At the end our upgrade was completely successful and we finished everything in our official schedule.